Difference between revisions of "Introduction"
| Line 4: | Line 4: | ||
'''<big>How to start with TARGET 3001!</big>'''<br> | '''<big>How to start with TARGET 3001!</big>'''<br> | ||
| − | + | ||
| − | + | [[Image:neues_Projekt_doppelseitig_e.jpg|530px|Dialog: Create new project double sided|left]] | |
| − | + | <p style="margin-top: 40px;"> | |
| − | + | Start a new project "Double sided PCB with schematic" and zoom into the schematic a bit with the mouse wheel.<br>Click the "Import component (Ins)..." icon in the toolbar.[[Image:Einfg_e.jpg]]<br> | |
| − | + | </p> | |
| − | + | <br><small>Related topics: [[Start assistant]] [[Schematic]] [[Drawing frame]] [[Page]] [[Coordinates]] [[Single sided layout]] [[Multilayer]]</small> | |
| − | + | <hr style="clear:both; margin:40px 0;"> | |
| − | + | ||
| − | + | ||
| − | + | [[Image:1n4148_e.jpg|530px|The TARGET 3001! component browser at diode 1N4148|left]] | |
| − | + | <p style="margin-top: 40px;"> | |
| − | + | The component browser opens and allows to search for the name of the diode, say '''1N4148'''. The device will be listed in green and the highlighted one displays its drawing elements. '''Import component''' gets the symbol to the schematic. The land pattern of the device including its 3D image is recognized as package proposal for the layout use. You may deviate from this proposal later if you would like to use a different package.<br> | |
| − | + | </p> | |
| − | + | <br><small>Related topics: [[Mousekeys]] [[Reference Symbol]] [[Rests of components]]</small> | |
| − | + | <hr style="clear:both; margin:40px 0;"> | |
| − | + | ||
| − | + | ||
| − | + | [[Image:phantom_e.jpg|530px|Component symbol and its phantom (before placement)|left]] | |
| − | + | <p style="margin-top: 40px;"> | |
| − | + | Import the symbol to the schematic and drop it by mouseclick as often as wanted. Release it from the cursor with [Escape] or press both mouse keys at the same time.<br> | |
| − | + | </p> | |
| − | + | <br><small>Related topics: [[Component_database#Component_seach|How do I find a certain component?]] [[Grid]] [[Component_database#The_parametric_search|The parametric search]]</small> | |
| − | + | <hr style="clear:both; margin:40px 0;"> | |
| − | + | ||
| − | + | ||
| − | + | [[Image:connectors_e_.jpg|530px|Connectors in the component browser when clicking the sidebar-symbol|left]] | |
| − | + | <p style="margin-top: 40px;"> | |
| − | + | [[image:connectors.jpg]]<br> | |
| − | + | By clicking an icon in the sidebar, such as connectors, the component database opens within this component group. We choose a two pin connector which immediately is fixed to the cursor tip. Every single element of a symbol drawing (outline, text, connection pin) can individually be displaced, turned, edited. For doing so in the context menu ('''[[M2]]''') the option "Always select entire component" '''must not be ticked'''. Otherwise you won't get a single element of a drawing marked.<br> | |
| − | + | </p> | |
| − | + | <br><small>Related topics: [[Select|s for select]] [[Edit|e for edit]] [[Options|o for options]] [[Sidebar]] [[Color]] [[Key combinations|Key-combinations]] </small> | |
| − | + | <hr style="clear:both; margin:40px 0;"> | |
| − | + | ||
| − | + | ||
| − | + | [[Image:param_suche_e.jpg|530px|Parametric Search|left]] | |
| − | + | <p style="margin-top: 40px;"> | |
| − | + | [[Image:wid.jpg]]<br> | |
| − | + | Clicking a resistor or capacitor symbol opens the parametric search, because we focus here on technical parameters rather than names. We'd like a resistance of "4.7kilo-ohms" so we enter 4k7. We select a package 0207 from the list and place the resistor to the circuit. In other cases please open the parametric search in the row of the component types using button [[Image: ParamSuche.jpg|Search by parameters]]<br> | |
| − | + | </p> | |
| − | + | <br><small>Related topics: [[Turn / rotate|Rotate a component by degrees]] [[Thermal Pads]]</small> | |
| − | + | <hr style="clear:both; margin:40px 0;"> | |
| − | + | ||
| − | + | ||
| − | + | [[Image: Schaltplan_Miniprojekt_e.jpg|530px|The symbols are imported|left]] | |
| − | + | <p style="margin-top: 40px;"> | |
| − | + | Thats how our canvas at this time may look like. | |
| − | + | <br> | |
| − | + | </p> | |
| − | + | <br> | |
| − | + | <hr style="clear:both; margin:40px 0;"> | |
| − | + | ||
| − | + | ||
| − | + | [[Image: Schaltplan_Miniprojekt2_e.jpg|530px|Wire pins|left]] | |
| − | + | [[Image:Schem_Router.jpg]]<br> | |
| − | + | In order to wire the pins we switch from the schematic router, which is preset to the bending mode: "Lay two segments first horizontal". The spacebar toggles between bending modes. "Snap on" boxes help hitting the connection correctly.[[Image: ZweiSemente_waagerecht.jpg]] The size of this little boxes depends on the grid which can be set using the icon "View". Connection is effected by mouseclick.<br> | |
| − | + | </p> | |
| − | + | <br> | |
| − | + | <small>Related topics: [[Groundplane|Ground plane]] [[Schematic router]] </small> | |
| − | + | <hr style="clear:both; margin:40px 0;"> | |
| − | + | ||
| − | + | ||
| − | + | [[image:Massefuesschen_e.jpg|530px|Place a ground symbol|left]] | |
| − | + | <p style="margin-top: 40px;"> | |
| − | + | [[Image: masse_sidebar.jpg]]<br>A ground symbol can be dragged and dropped from the sidebar. After placement we wire it towards the existing signal so we get asked to give it a new name. GND by default - which we accept.<br> | |
| − | + | </p> | |
| − | + | <br> | |
| − | + | <small>Related topics: [[Outline|PCB Outline]] </small> | |
| − | + | <hr style="clear:both; margin:40px 0;"> | |
| + | |||
| + | |||
| + | [[image:Btl_immer_komplett_e.jpg|530px|Highlight a component completely or only a part of it|left]] | ||
| + | <p style="margin-top: 40px;"> | ||
| + | [[Image:Einfg.jpg|Bauteil einfügen]]<br> | ||
| + | Sometimes you don't want to move the whole symbol but only a part of it, maybe the cmponent name. By default TARGET highlights the entire drawing. Open the context menu with the right mousekey and untick the entry "Always select entire component". Now every drawing element can be moved and edited separately. | ||
| + | <br> | ||
| + | </p> | ||
| + | <br> | ||
| + | <small>Related topics: [[Pointer toolbar]] </small> | ||
| + | <hr style="clear:both; margin:40px 0;"> | ||
| + | |||
| + | |||
| + | [[image:platinenumriss_e.jpg|530px|PCB outline assistant|left]] | ||
| + | <p style="margin-top: 40px;"> | ||
| + | [[image:zurplatine.jpg|left]]<br> | ||
| + | We turn now to the layout view. We get asked to determine a board outline. For our little project 50 millimeters width and 30 millimeters height is OK.<br> | ||
| + | </p> | ||
| + | <br> | ||
| + | <small>Related topics: [[Outline|Outline by hand]] [[Layer]]</small> | ||
| + | <hr style="clear:both; margin:40px 0;"> | ||
| + | |||
| + | |||
| + | [[Image:platziert_oben_e.jpg|530px|Placement on top of the board outline|left]] | ||
| + | <p style="margin-top: 40px;"> | ||
| + | Use the auto placer to bring the the packages into the layout. They are by default placed above the outline. Now drag and drop them to their desired position. Clicking the right mouse button allows to rotate them by 90° before placement. | ||
| + | <br> | ||
| + | </p> | ||
| + | <br> | ||
| + | <small>Related topics: [[Autoplacer]] [[Airwires / Ratsnest]]</small> | ||
| + | <hr style="clear:both; margin:40px 0;"> | ||
| + | |||
| + | |||
| + | |||
| + | [[Image:layout_miniprojekt_e.jpg|530px|Place a via and continue on the other side|left]] | ||
| + | <p style="margin-top: 40px;"> | ||
| + | In the "draw track" mode press functional key '''[F8]''' in order to switch on the cross hairs. Again we can toggle the bending modes using the space bar. During the placement of the tracks a via can be placed using the "full stop" key [[Image:punkt.jpg]] It switches over to the opposite side of the board so that you can place signal tracks there. Pressing full stop again, another via is placed and you are back on the layer you started from. Double clicking any drawing element allows individual setting. | ||
| + | <br> | ||
| + | </p> | ||
| + | <br> | ||
| + | <small>Related topics: [[Thermal Pads]] [[Select]] </small> | ||
| + | <hr style="clear:both; margin:40px 0;"> | ||
| + | |||
| + | |||
| + | [[Image:miniprojekt_3d_e.jpg|530px|3D view of the board|left]] | ||
| + | <p style="margin-top: 40px;"> | ||
| + | [[Image:3d_ikone.jpg]]<br> | ||
| + | In the 3D view, we examine the plausibility of the construction and by this means we get a good impression how our board will look like after it is finished. Create production data in menu "File/Input-Output Formats".<br> | ||
| + | </p> | ||
| + | <br> | ||
| + | <small>Related topics: [[Package proposal]] [[3D View]] [[Gerber]]</small> | ||
| + | <hr style="clear:both; margin:40px 0;"> | ||
| + | <br><br><br><br> | ||
| + | |||
| + | |||
[[fr:Introduction]][[de:Einführung]][[Category:homepage]] | [[fr:Introduction]][[de:Einführung]][[Category:homepage]] | ||
Revision as of 13:42, 8 March 2019
This article as a PDF file: How do I create a PCB Layout?
How to start with TARGET 3001!
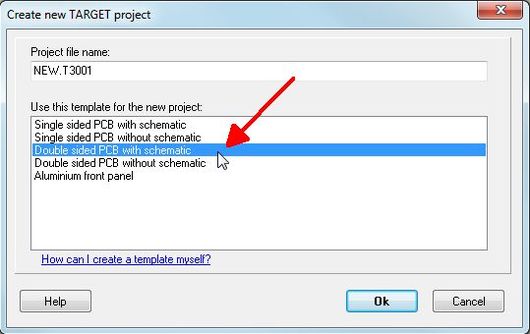
Start a new project "Double sided PCB with schematic" and zoom into the schematic a bit with the mouse wheel.
Click the "Import component (Ins)..." icon in the toolbar.
Related topics: Start assistant Schematic Drawing frame Page Coordinates Single sided layout Multilayer
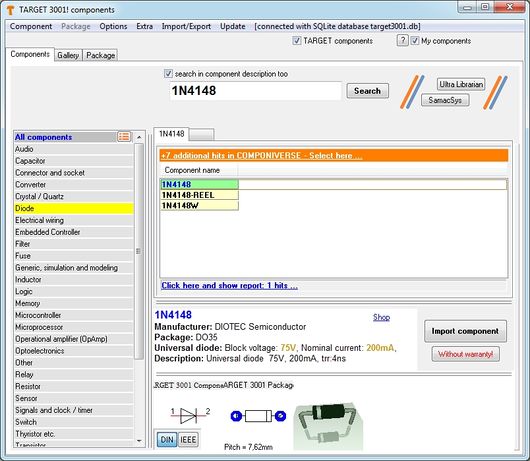
The component browser opens and allows to search for the name of the diode, say 1N4148. The device will be listed in green and the highlighted one displays its drawing elements. Import component gets the symbol to the schematic. The land pattern of the device including its 3D image is recognized as package proposal for the layout use. You may deviate from this proposal later if you would like to use a different package.
Related topics: Mousekeys Reference Symbol Rests of components
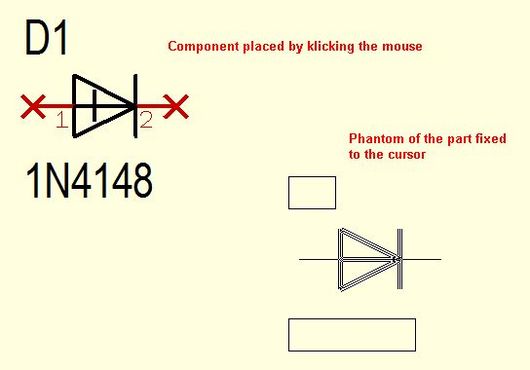
Import the symbol to the schematic and drop it by mouseclick as often as wanted. Release it from the cursor with [Escape] or press both mouse keys at the same time.
Related topics: How do I find a certain component? Grid The parametric search

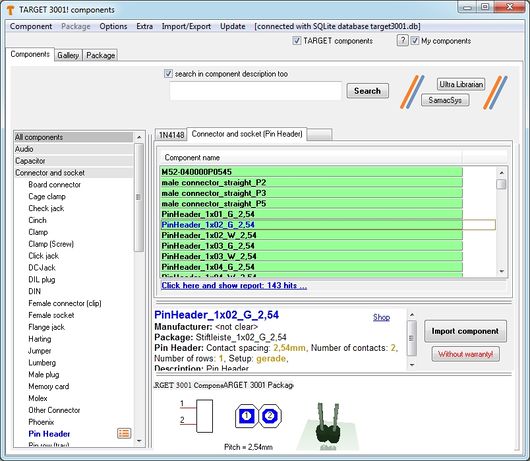
By clicking an icon in the sidebar, such as connectors, the component database opens within this component group. We choose a two pin connector which immediately is fixed to the cursor tip. Every single element of a symbol drawing (outline, text, connection pin) can individually be displaced, turned, edited. For doing so in the context menu (M2) the option "Always select entire component" must not be ticked. Otherwise you won't get a single element of a drawing marked.
Related topics: s for select e for edit o for options Sidebar Color Key-combinations
![]()
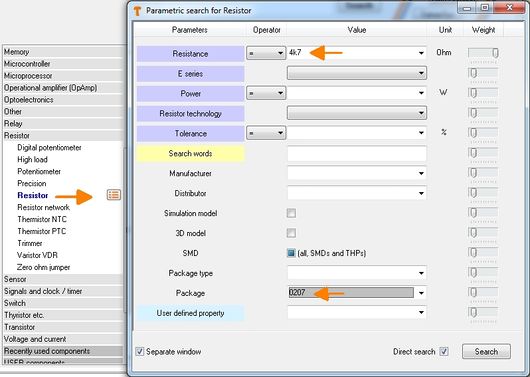
Clicking a resistor or capacitor symbol opens the parametric search, because we focus here on technical parameters rather than names. We'd like a resistance of "4.7kilo-ohms" so we enter 4k7. We select a package 0207 from the list and place the resistor to the circuit. In other cases please open the parametric search in the row of the component types using button ![]()
Related topics: Rotate a component by degrees Thermal Pads
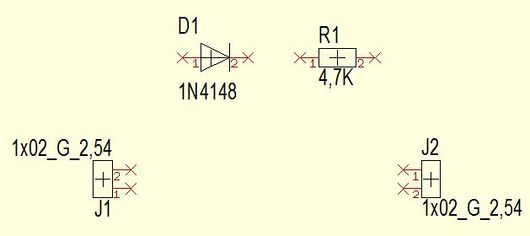
Thats how our canvas at this time may look like.
![]()
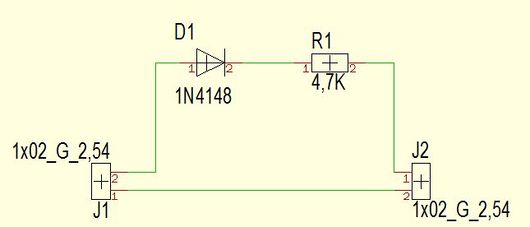
In order to wire the pins we switch from the schematic router, which is preset to the bending mode: "Lay two segments first horizontal". The spacebar toggles between bending modes. "Snap on" boxes help hitting the connection correctly.![]() The size of this little boxes depends on the grid which can be set using the icon "View". Connection is effected by mouseclick.
The size of this little boxes depends on the grid which can be set using the icon "View". Connection is effected by mouseclick.
</p>
Related topics: Ground plane Schematic router
![]()
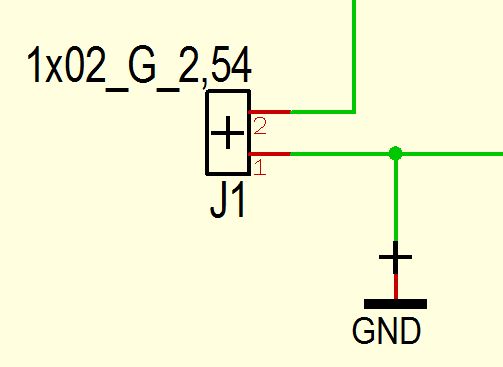
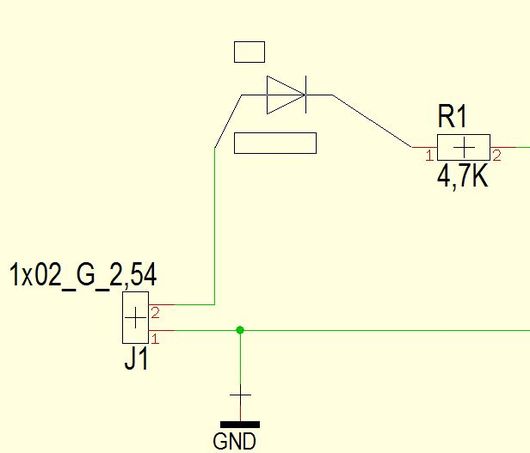
A ground symbol can be dragged and dropped from the sidebar. After placement we wire it towards the existing signal so we get asked to give it a new name. GND by default - which we accept.
Related topics: PCB Outline
Bauteil einfügen
Sometimes you don't want to move the whole symbol but only a part of it, maybe the cmponent name. By default TARGET highlights the entire drawing. Open the context menu with the right mousekey and untick the entry "Always select entire component". Now every drawing element can be moved and edited separately.
Related topics: Pointer toolbar
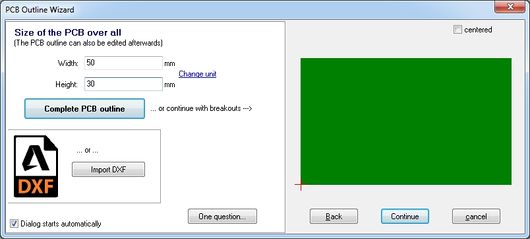
We turn now to the layout view. We get asked to determine a board outline. For our little project 50 millimeters width and 30 millimeters height is OK.
Related topics: Outline by hand Layer
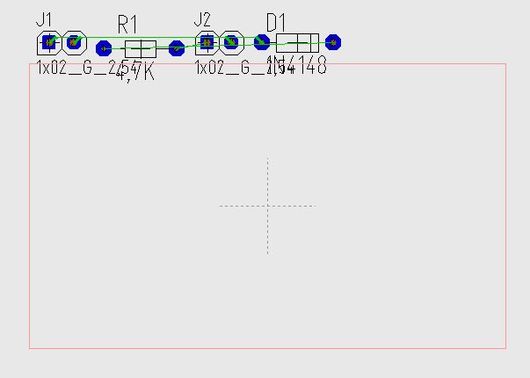
Use the auto placer to bring the the packages into the layout. They are by default placed above the outline. Now drag and drop them to their desired position. Clicking the right mouse button allows to rotate them by 90° before placement.
Related topics: Autoplacer Airwires / Ratsnest
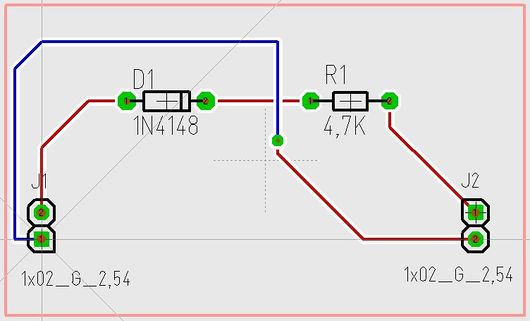
In the "draw track" mode press functional key [F8] in order to switch on the cross hairs. Again we can toggle the bending modes using the space bar. During the placement of the tracks a via can be placed using the "full stop" key  It switches over to the opposite side of the board so that you can place signal tracks there. Pressing full stop again, another via is placed and you are back on the layer you started from. Double clicking any drawing element allows individual setting.
Related topics: Thermal Pads Select
![]()
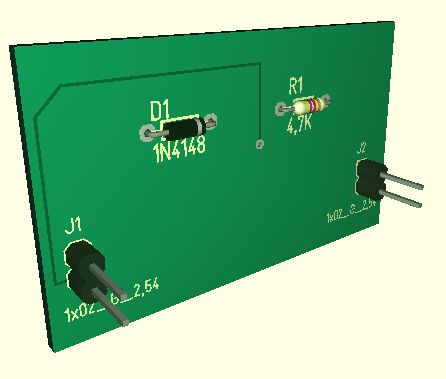
In the 3D view, we examine the plausibility of the construction and by this means we get a good impression how our board will look like after it is finished. Create production data in menu "File/Input-Output Formats".
Related topics: Package proposal 3D View Gerber


