Component properties
Component properties and SQLite data base
Say you had found a matching part in the data base and now like to view/modify it's properties. Let's take a 10K resistor in a SMD package having a simulation model, and a 3d model (found by the use of the parametric search):
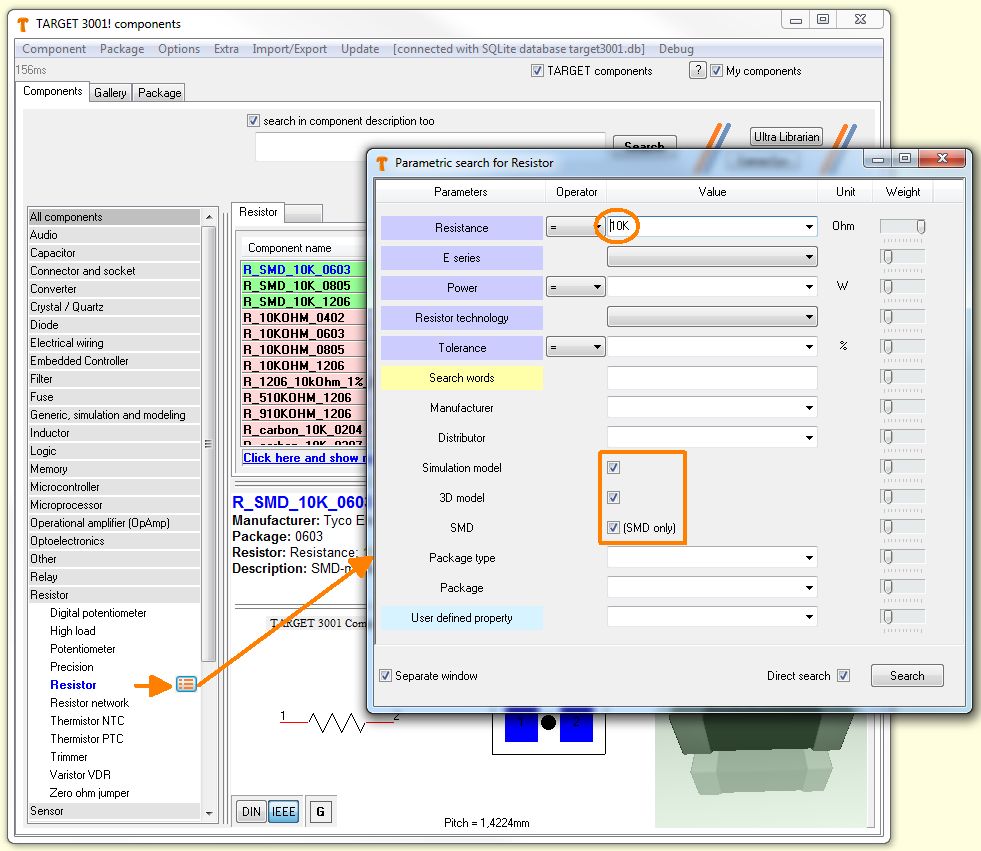
Image: Search a a smd resistor 10K with simulation model and 3D model
In green you see matching search results. Several packages could be chosen, we decide for a 0603. Now click M2 (with the right mouse key) upon the line (green) of the desired component. A context menu opens:
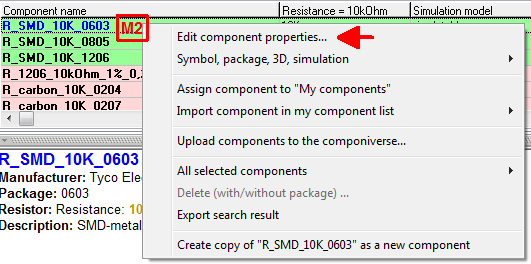
Image: Right mousekey opens context menu
Use option "Edit component properties...". You will find the same option in the database menu Component.
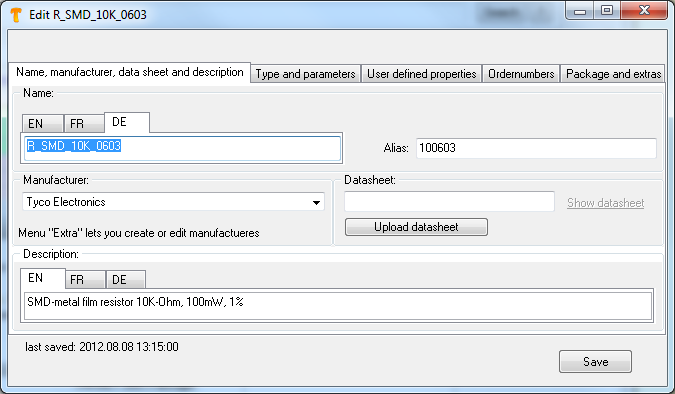
In the opening dialog at first we select the tab "Name, manufacturer", data sheet and description".
Name, manufacturer, data sheet and description...
All fields can be manipulated according to your wishes at every time. The sub tabs DE, EN and FR stand for name and/or description in German, English or French language. If you add/change anything and save the part, it gets "yours". That means that a copy is made and furnished with a little black flag showing "User" at the end of the green line in the list of the search results. Now it will be safe from all update activities by genuine TARGET resources. We continue with tab Type and parameters:
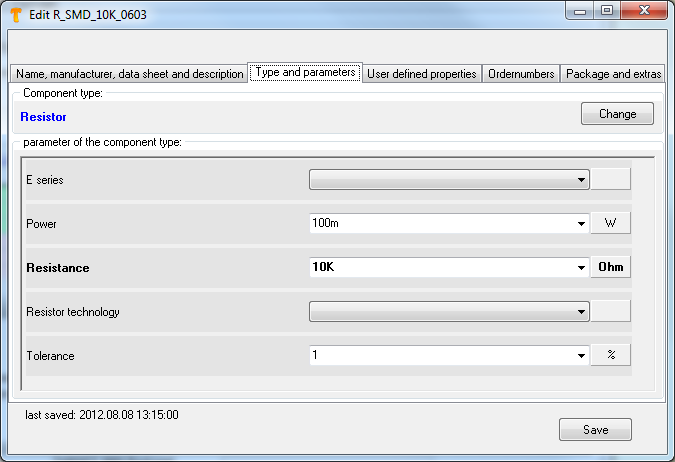
Type and Parameters
The line "Component type" identifies this part as component type "Resistor". Using the button "Change" a different component type can be chosen. Within the lower part of the dialog you see all parameters this component type might have. You can enter, modify or delete entries according to your wishes at any time. Additional parameter kinds can be generated in database menu "Extra/Edit component types". See article: Add new parameters to a component type. Now let's have a look at tab User defined properties:
User defined properties
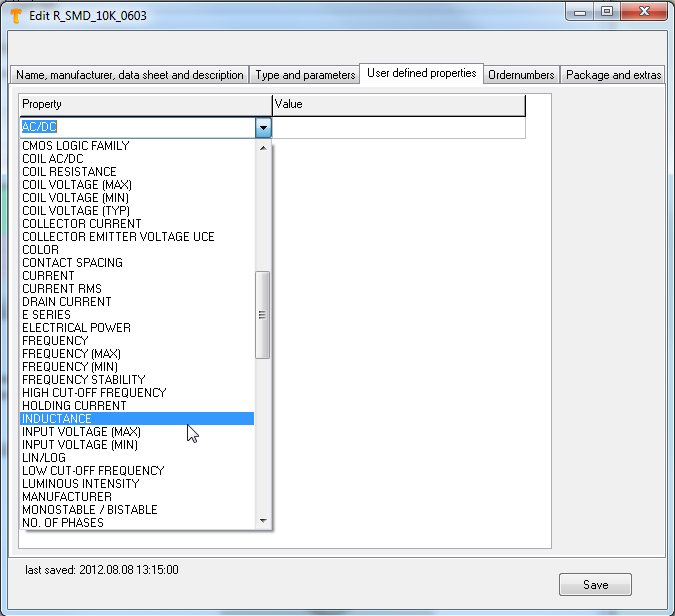
Probably you might see this dialog empty, because in our example no user defined properties have been entered yet. If you have converted parts having user defined properties from older libraries, you will find them here. Enter your desired property to the top field to the left and enter the value which it shall achieve besides to the right. (Imagine the Maufacturer Part Number). You can use the drop down list. Later you might search for this property or let it be listed within the BoM. At the same time this individual property now appears in the drop down list of predefined properties so that it easily can be chosen with other parts. Now let's have a look at tab Order numbers...:
Order numbers
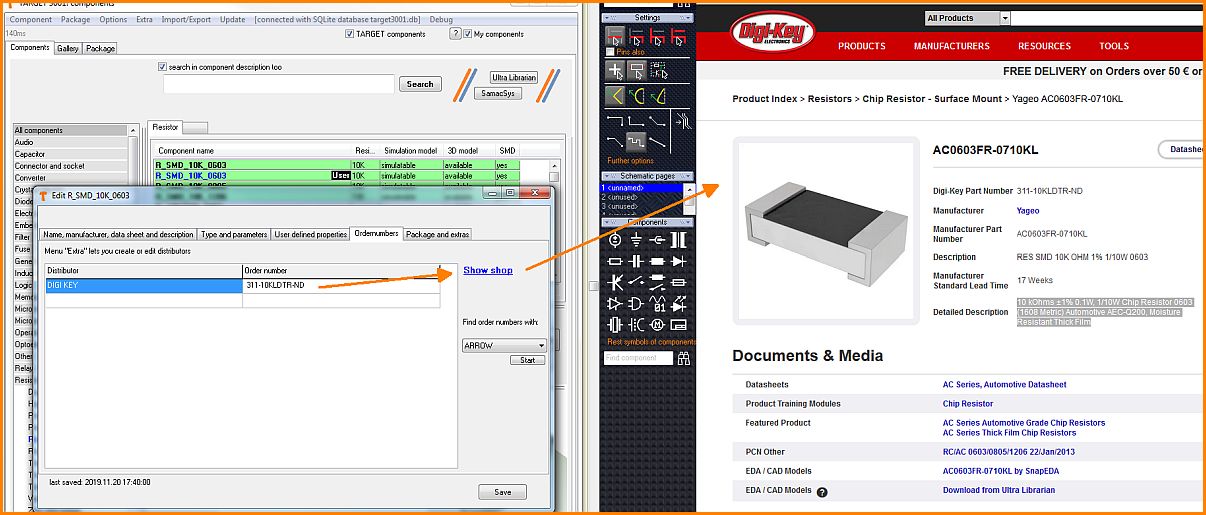
Have an overview on distributors having exactly this part in their line card as well as the order numbers which currently are known to TARGET 3001!. In this case it's DigiKey. If you highlight the distributor and click the link "Show shop" you will reach exactly this part in the distributor's web shop. Here you get all information the distributor offers: data sheet, price, availability... Data base menu Extra allows to create or edit distributors.
Furthermore you can forward a search for a component using its name to the search field of a distributor's web shop. In this drop down list "Find order numbers with:" now select one of your desired distributors e.g. ARROW.

Image: ...TARGET brings you close to the part in the ARROW web shop. This is a dual screen image. To the left you see TARGET, right you're in your web browser having the ARROW web shop automatically opened. now you can easily copy and paste all details...
Last but not least let's take look at Package and extras:
Package and extras
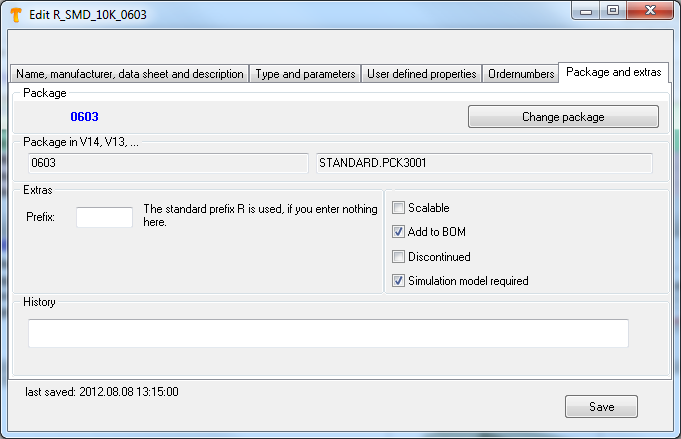
The middle part shows the entry "Prefix". For a resistor the prefix is "R" for example. To the right you see some checkboxes. When ticked, it means:
Scalable: This part contains only image elements (e.g. a logo). It shall be marked as variable in size. As soon as the object solely has a pin, this function is idle.
Add to BOM: Marks that this component can be part of a Bill of Material (BoM). For example with a logo which actually is handled as a package too this would not make sense because you would not bring it to a BoM.
Discontinued, Obsolete: The component is not produced resp. sold anymore.
Simulation model required: Sometimes the assignment of a simulation model with some components (e.g. connectors) does not make sense. Therefore a TARGET 3001!-warning "Simulation model missing" would not make sense too. To avoid it tick the box.
The entry History refers to the development of this part in time response. Enter your comments here.
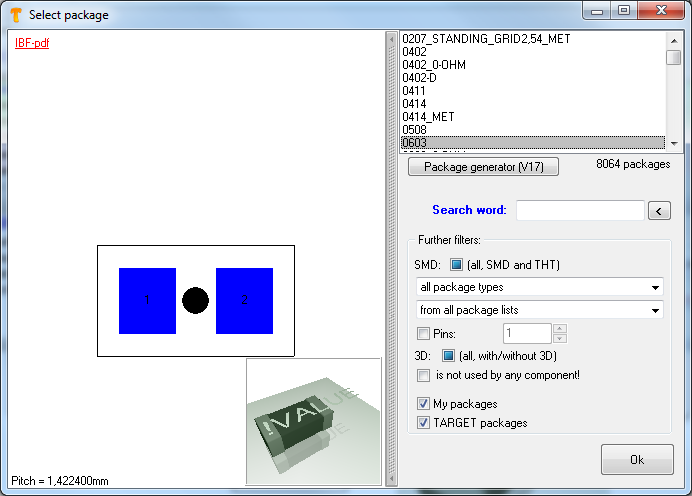
We were aware of this component having a 0603 package. If you want to assign a different package to this part, you can do it in this dialog. A click on button "Change Package" (top right) opens an appropriate browser to change for alternatives including a 3D view.
Reload properties from a CSV file
Please find this function in component browser menu "Extra/Reload properties from a CSV file"
Such a CSV file uses the colon as a divider and expects the following line structure:
Componentname;Manufacturer:Property1=value1|Property2=value2|Property3=DELETE!
2N2905;STMicroelectronics:CollectorCurrent=1A
2N2905:CollectorCurrent=1A
NE555D:Ident=123456|Stock=Munich|Temperature=63°C|WegMit=DELETE!
4055:Ident=654321|Meier=Müller
It is always attempted at first to use a USER component with this name. If not available, a TARGET component is used. The manufacturer including the semicolon can also be omitted. If the name exists more than once, an error message is displayed Several property value pairs are separated with the vertical bar (tube). If the part is a USER component, then the system also tries to set the property as a part parameter. Otherwise, a user-defined property is always created or changed. The value DELETE! effects that the property is deleted completely.
A line beginning with // is a comment line. Please note that the encoding of the CSV text file must be ANSI, not e. g. UTF-8!
Create components from a CSV file
Please find this function in component browser menu "Extra/Create components from a CSV file"
As a text file the CSV must be structured as follows:
//NewName;SourceName;Manufacturer;Prop1=Text1|Prop2=Text2|Prop3=Text3
NE555_1;NE555D;Texas Instruments;Prop1=Hello|Prop2=ladies and|Prop3=gentlemen!
NE555_2;NE555D;Texas Instruments;Prop1=This|Prop2=is a new|Prop3=feature
Lines with // at the beginning are comments. First comes the name of the part to be generated (NewName). Then comes the name of the source part from which it is to be derived (SourceName). The manufacturer's name (Manufacturer) can also remain empty if the source component can be uniquely identified without the manufacturer, but the semicolon must still appear. The 3 entries are each completed with a semicolon. Then parameters and properties can come. The property and the value are separated by a =, the different properties are separated by a vertical bar (tube).
If the new component is to have a manufacturer or a different one, the parameters Manufacturer=XYZ can be put to the end of the list.
If a "new" component already exists, only the properties are refreshed. Please note that the encoding of the CSV text file must be ANSI, not e. g. UTF-8! If umlauts and special characters are incorrect, please change the source code accordingly!
Component properties in V14 and before
The following explications refer to V14 and before!
Every component in TARGET 3001! can have an endless (!) list of properties. Any property you might think of can simply be added to the list:
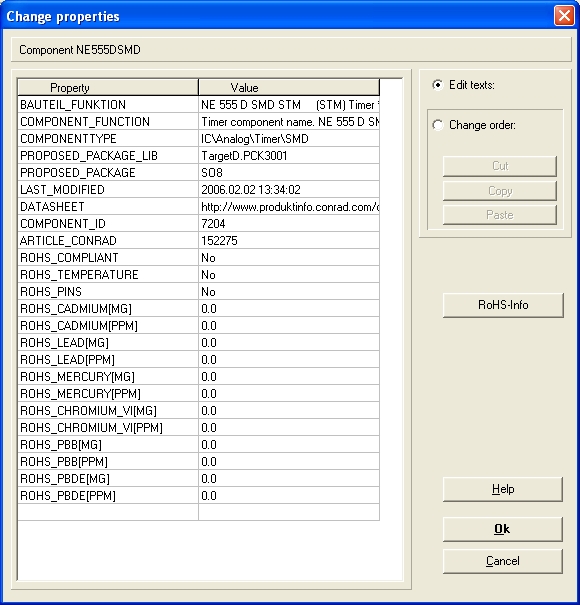
The dialog "Edit properties" you will find...
- by the Context menu entry "Edit properties"
- by the Context menu in the Library Browser (press button
 )
) - by double click (M11) upon the handle of a component and using the button
 in the flashing dialog
After click on it in the schematic the following dialog appears:
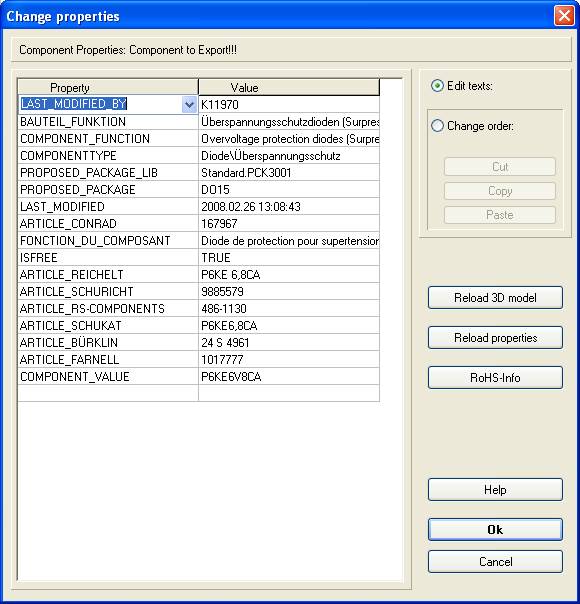
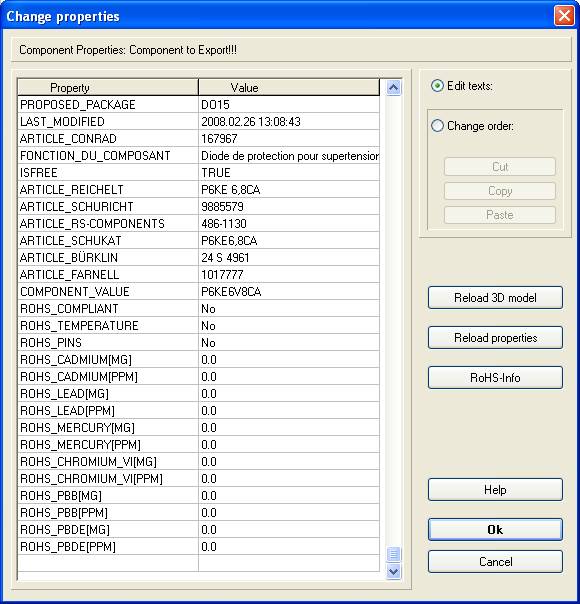
This is where the user-definied properties of components and signals are administrated. You are able to add new properties by clicking on the last entry. A new empty entry will be imported. You can enter any property and any value. If you want to delete or relocate entries, please activate the radio button "Change order" on the right hand side of the dialog. Use "Cut" / "Copy" / "Paste". There is also the possibility to download an existing 3D-model for a package and to recharge the properties. The button "RoHS-Info" enlarges the list of properties with aspects concerning RoHS.
Reload Component Properties
Schematic Menu Components / "Reload Component Properties"
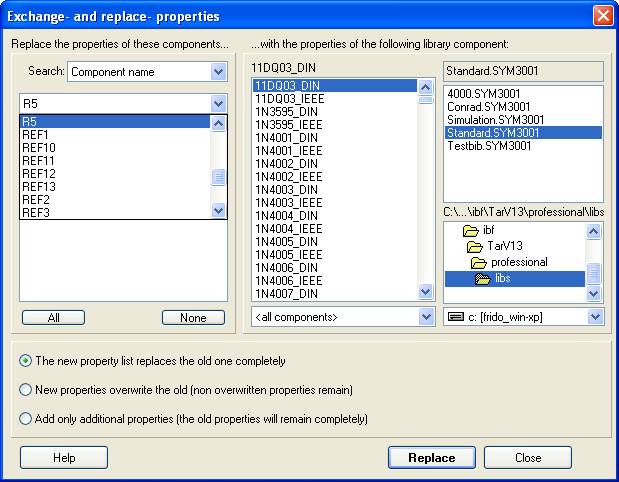
In the dialog download component properties only the properties of the components in the schematic are replaced. At first you choose a component type and the components from the list for which the properties shall be replaced. In the right area you choose the new component from a component library. Below you activate the appropriate radio button for the component information. This function might be very helpful when you want to exchange and replace properties of components in the whole schematic.
Load properties from database
Properties (eg. distributor's information) can be loaded "en bloc" from a database to TARGET 3001! components. Precondition is: the component must be identifiable. What you need is a list in spreadsheet form or text, cells divided by tabs. In TARGET 3001! please press function key [F2] for opening the Library Browser. Use section "Library" and click M2 on a library which shall receive additional properties.
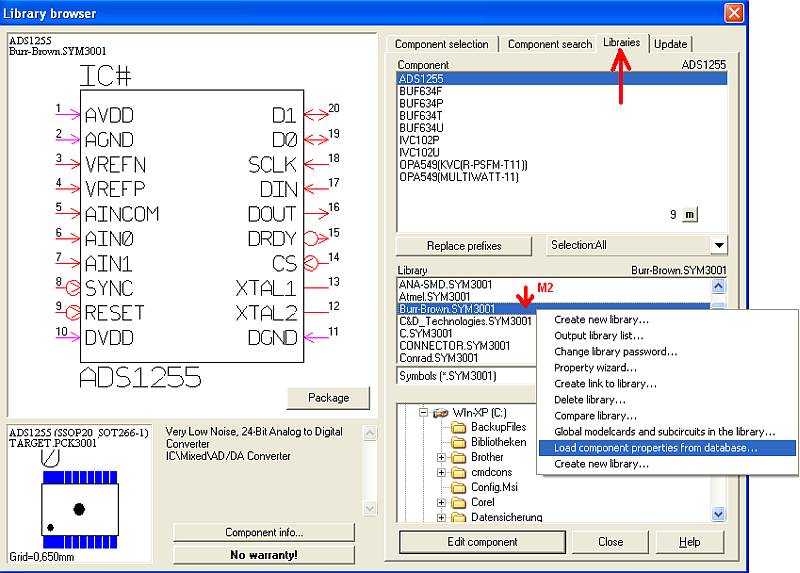
Select from a flashing context menu entry: "Load component properties from database". Let's say the components of your Library all would have the property "Order-number". By means of the ordernumber the components can be identified individually.
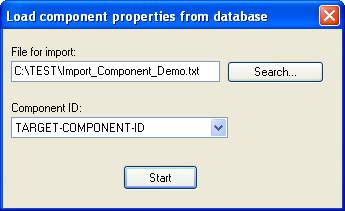
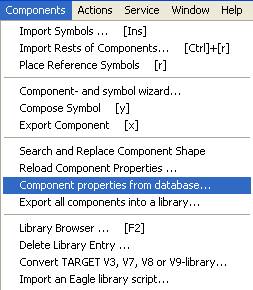
So use the ordernumber as an ID for an individual assignment of other properties, e.g. new prices. Use "Menu Components" for the assignment of new additional properties:
Please make sure that the database shows the column "Order-number" as well as the column "New Prices".
You can do this for components in a library and also for components within a project. You need a CSV or TXT file, fields separated with TAB keys. Also you need an non-ambiguous ID in the existing component values to exactly address the right component for the new properties. If several components have the same ID, they get the same values set.
A detailed example
Imagine you have particular component properties from a data base which you want to add to your TARGET 3001!-components. With TARGET 3001! you are able to charge component properties for components of a certain project or for components of a certain library. In this example you can see a chart made by a common spreadsheet (fields devided by tabs):

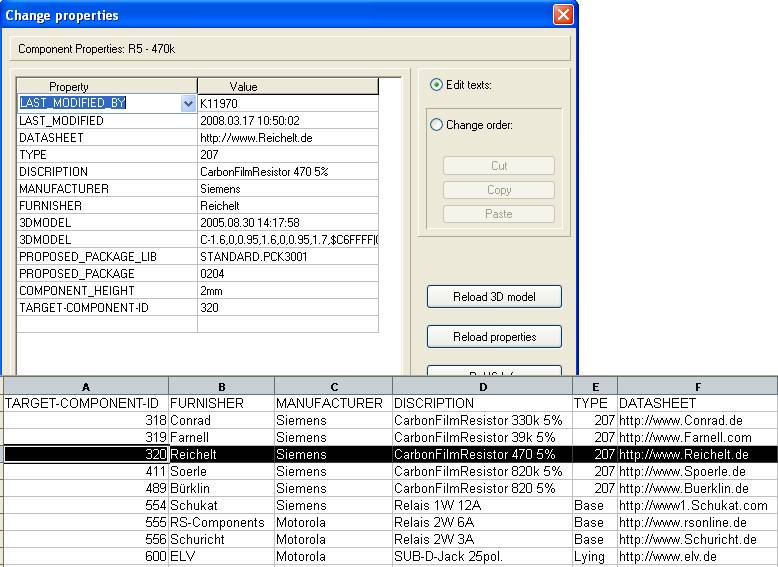
Classes of properties have to be in the first line, not in the first column. For adding a set of properties to certain component it must be identifiable by a one of the properties of the above list. We choose the attribute "TARGET-COMPONENT-ID". Any form of identification of this chart is possible it just has to be explicit.
We start with downloading properties of components from a project. Open the schematic and choose one of the concerning components:
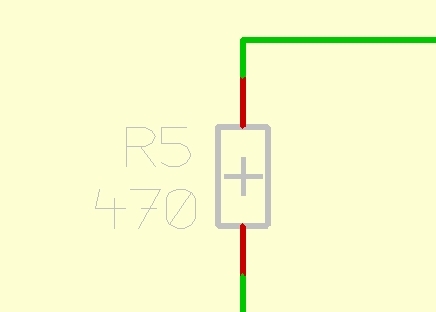
Double click M11 on the handle cross of the component opens the dialog "Change Symbols".
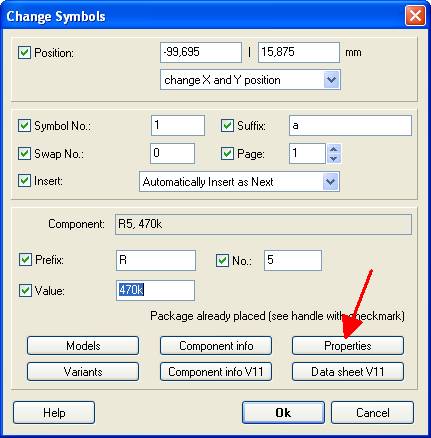
Now use the button ![]() . The dialog "Change properties" opens...
. The dialog "Change properties" opens...
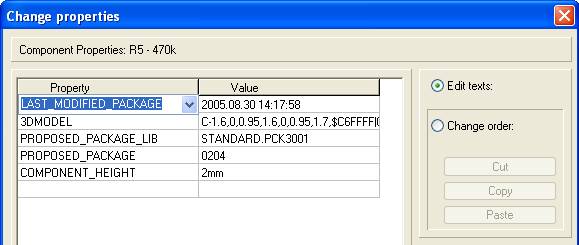
...which shows the current component properties. We identify the selected component, a resistor with 470K, for the data transfer by adding the line "TARGET-COMPONENT-ID". For this you just click the line and write. To the right you enter the value, in this case 320, as you can see from the list.
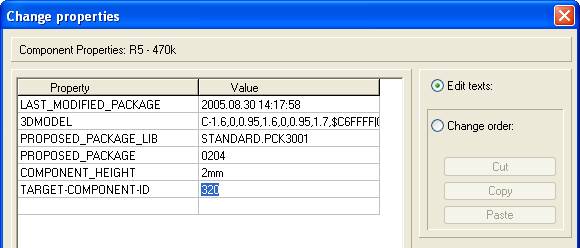
By this entry TARGET 3001! knows that the properties for the componet according to the list are supposed to be charged with TARGET-COMPONENT-ID 320. Choose "Component properties from database" from Menu Components....
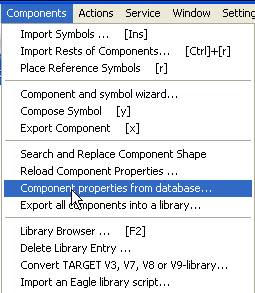
...the following dialog opens. On the one hand now you have to define which attribute you want the components to be identified with (in our case accordant to column A, TARGET-COMPONENT-ID). On the other hand you must define the path, which leads to the chart.

After pressing the button "Start" you get a message...
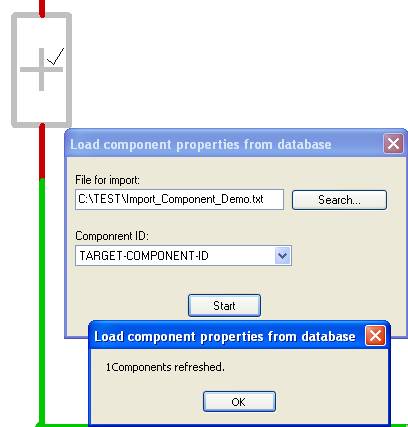
that TARGET3001! has updated a component, of course the one we just had identified. Opening now the property list of the components we see that all properties have been enclosed:
If you want to add properties from datasets to your components in libraries, please choose the desired library from the library-browser (function key [F2]). Now press M2. Choose the issue "Load component properties from data base..."
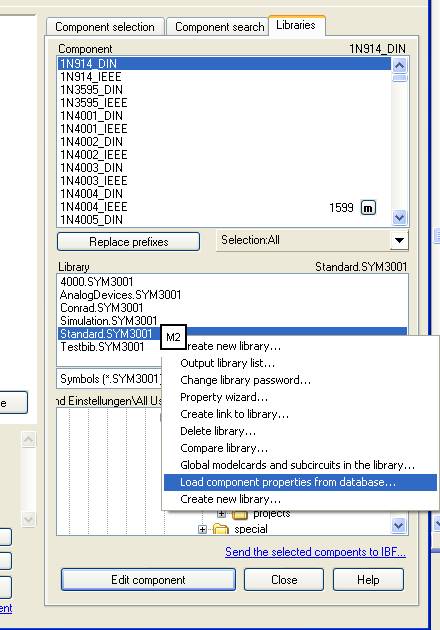
The following dialog opens and the same steps are to be done. It is important that every component of the library has a corresponding identification from the underlying data base.

List of component properties (example)
| Component property | Value |
|---|---|
| 3DMODEL | 3D-model for a package |
| AIRWIRECOLOR | Supplemental colour for airwires |
| ALLOW_HOLE_IN_SMD | Project test: Allows drill hole in a SMD-pad |
| ANCHOR | |
| ARTICLE_BUERKLIN | OrderNo.: Bürklin |
| ARTICLE_CONRAD | OrderNo.: Conrad |
| ARTICLE_DIGIKEY | OrderNo.: DigiKey |
| ARTICLE_ELFA | OrderNo.: Elfa |
| ARTICLE_FARNELL | OrderNo.: Farnell |
| ARTICLE_REICHELT | OrderNo.: Reichelt |
| ARTICLE_RSCOMPONENTS | OrderNo.: RS-Components |
| ARTICLE_SCHUKAT | OrderNo.: Schukat |
| ARTICLE_SCHURICHT | OrderNo.: Schuricht |
| ARTICLE_SELECTRONIC | OrderNo.: Selectrontic |
| ARTICLE_SPOERLE | OrderNo.: Spörle |
| BAUTEIL_BIB | |
| BAUTEIL_FUNKTION | Bauteilbeschreibung deutsch |
| BIB_COMPONENT | |
| BILL_OF_MATERIAL | Value "NO" excludes the component from the bill of material (BOM) |
| BLOCKID | |
| CABLE_COLOR | |
| CABLE_CROSS_SECTION | |
| CABLE_QUALITY | |
| CELL_OUTOF | |
| CELL_RIPPED_UP | |
| CELL_VALUE | |
| CELLGEN_VALUE | |
| CELLID | |
| COMPARISON_TYPE | Comparison type for components |
| COMPATIBILITY | |
| COMPONENT_FUNCTION | Component description english |
| COMPONENT_HEIGHT | Component height concerning the package (STEP export, 3D view) More... |
| COMPONENT_HISTORY | Component history |
| COMPONENT_ID | Component ID |
| COMPONENT_NAME | Component name english |
| COMPONENT_VALUE | Component value |
| COMPONENTGROUP | Component group |
| COMPONENTTYPE | Component type |
| COPPER_INSIDE | |
| CORE | |
| CORRESPONDING_TO | |
| DATASHEET | Datasheet link |
| EXECUTE | |
| FONCTION_DU_COMPOSANT | Component description french |
| GENINFO | Interne information concerning the package assistant |
| GROUNDGRID | |
| HARNESS | |
| ID_TRIANGLE_MISSING | |
| IS_CLAMP | |
| IS_COPY_NO | |
| IS_COPY_OF | |
| IS_MEASURE | |
| ISFREE | Standard component for the online library |
| IS_SMD | |
| LAST_MODIFIED | Date of the last mofification of the component |
| LAST_MODIFIED_BY | Customer number from the last editor of the component |
| LAST_MODIFIED_PACKAGE | Date of the last modification of the package |
| MANUFACTURER | Component manufacturer |
| Max_Current | |
| Max_Power | |
| Max_Voltage | |
| MULTILINE | |
| NO_3D_EXTRUSION | This component has no 3D model |
| NOM_DU_COMPOSANT | component name french |
| ORIGINAL_NAME | |
| ORDER_NAME | This property overwrites the component type name which is assigned to the part the way it comes from the database, if applicable. |
| PACKAGE_LOCKED | Block package against switching |
| PADNAME | |
| PICK_AND_PLACE | Value "NO" excludes the component from the pick&place list |
| PICTURE | |
| PROPOSED_PACKAGE | Name of proposed package |
| PROPOSED_PACKAGE_LIB | library for proposed package |
| SCALED | Component can be scaled at the import |
| SPICE-MODEL | |
| SUBCELL# | |
| SUPPLIER | Old component order information |
| Tolerance | |
| USED_PACKAGE | Used proposed package |
| USED_PACKAGE_LIB | Used library for proposed package |
| WRONG_CELL | |
| WRONG_CELL_VALUE | |
| SIM_MODEL_NEEDED | Components which do not have a simulation model get a "No" |
| SIMELEM | |
| TESTPOINT |


