Zero Ohm Resistor
General
Instead of a wire bridge it is considerable to use a Zero Ohm Resistor. It's advantage against a wire bridge is the possibility of automated assembly. Another idea is to use a Zero Ohm Resistor in a layout like a jumper.
In TARGET 3001! two situations are thinkable to place a Zero Ohm Resistor:
- In the layout with a symbol accordingly in the schematic
- Only in the layout as a "free package" without a symbol in the schematic
Zero Ohm Resistor in layout and schematic
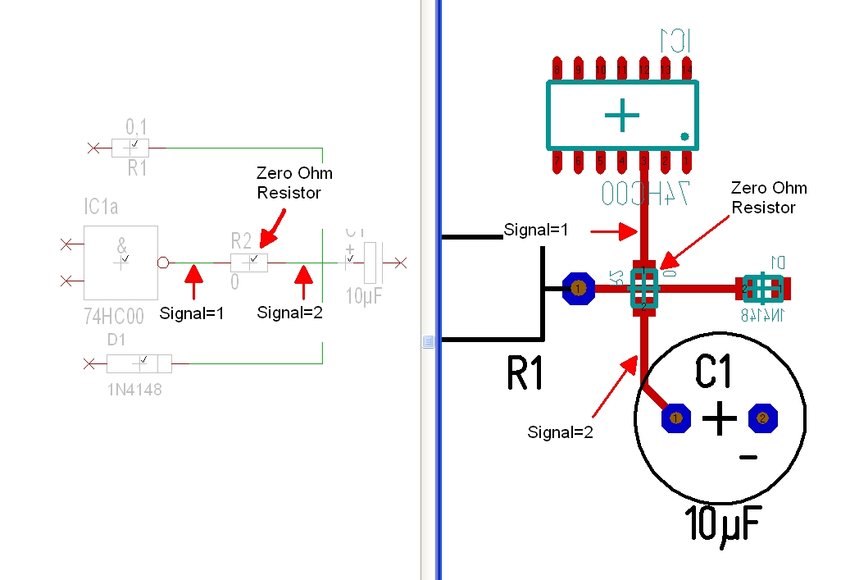
Advantage here is, that the spectator of the board does not need to wonder about an additional, non documented component showing up the layout. For this variant it is necessary that the topology of the signal in schematic and layout is the same. Cut the signal in the schematic at an appropriate point and place the symbol of a Zero Ohm Resistance. Place a matching package accordingly in the layout, for example a "0805". The signal names are different at either side of the Zero Ohm Resistor.

Figure 1: Use of a Zero Ohm Resistor in schematic and layout
Zero Ohm Resistor in the layout without symbol in the schematic
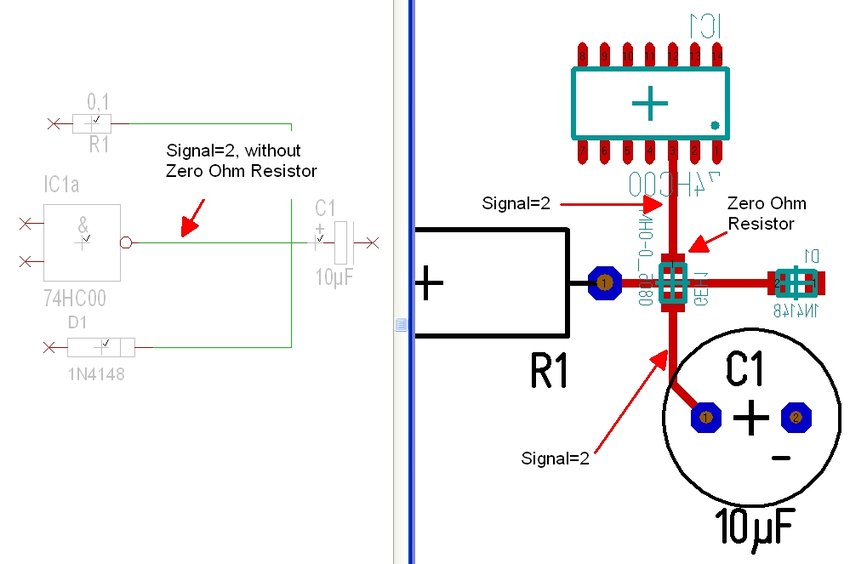
Advantage here is the logical signal flow in the schematic is not interrupted by a "component less function". The topology of the signal may be completely different in schematic and layout. As a bare means of layout you insert a "1008_0-Ohm" like a free package. This one has an internal bridge so that in the layout does not remain a ratsnest. The signal name is the same on either side of the Zero Ohm Resistor.

Figure 2: Use of a Zero Ohm Resistor only in the layout
The easiest way to give the solder pads the correct signal name is to change the thin bridge inside the package: First determine the signal name of the interrupted wire. Hover the mouse over the center of the zero ohm resistor and type the [s] key twice so that the very thin bridge line flashes. Now type the [e] button and give the bridge the desired signal name. The two solder points will follow this change. You can now connect the tracks on both sides to the pads.
Translated with DeepL.com (free version)
Links:
http://en.wikipedia.org/wiki/Zero-ohm_link
.

