

Difference between revisions of "SnapEDA"
(→Load a 3D model) |
|||
| (18 intermediate revisions by the same user not shown) | |||
| Line 1: | Line 1: | ||
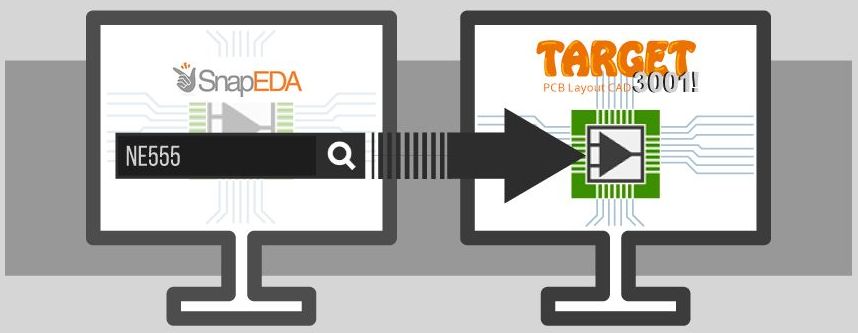
| − | <big><b>SnapEDA | + | <big><b>[https://www.snapeda.com/ SnapEDA] is a search engine for electronic components including CAD data and data sheets.</b></big><br> |
Drag and drop your desired part to your TARGET 3001! design. It is that easy. Once a component is downloaded, its CAD data instantly are taken to the TARGET 3001! component data base so you have it for further projects too.<br><br> | Drag and drop your desired part to your TARGET 3001! design. It is that easy. Once a component is downloaded, its CAD data instantly are taken to the TARGET 3001! component data base so you have it for further projects too.<br><br> | ||
| Line 6: | Line 6: | ||
<td><span class="plainlinks">[[image:snapeda_to_target.jpg|snapeda_to_target.jpg|link=https://www.snapeda.com/|SnapEDA Search-Engine]]</span></td> | <td><span class="plainlinks">[[image:snapeda_to_target.jpg|snapeda_to_target.jpg|link=https://www.snapeda.com/|SnapEDA Search-Engine]]</span></td> | ||
</tr> | </tr> | ||
| − | + | <tr> | |
| − | <td><b>Video 2 min</b><br>[[image: | + | <td><b>Video 2:23 min</b><br>[[image:snapVideoBild-play300.jpg|link=https://server.ibfriedrich.com/video/e/snapeda/snapeda_and_target3001.mp4|left|Video 2:23 min]]</td> |
| − | </tr | + | </tr> |
</table> | </table> | ||
| − | <br><br> | + | <br><br> |
| − | |||
= Search a part in TARGET and redirect the request to SnapEDA = | = Search a part in TARGET and redirect the request to SnapEDA = | ||
| Line 28: | Line 27: | ||
First select the TARGET 3001! format from the list:<br><br> | First select the TARGET 3001! format from the list:<br><br> | ||
| + | [[Image: snapeda_ne555_11.jpg|select format|none]]Image: select TARGET 3001! format.<br><br><br> | ||
| − | [[Image: | + | |
| + | Now save the file to your standard download directory:<br><br> | ||
| + | [[Image: snapeda_ne555_12.jpg|select format|none]]Image: select TARGET 3001! format.<br><br><br> | ||
TARGET monitors the mentioned download directory. The path to it must be set in TARGET. This is an example setting:<br><br> | TARGET monitors the mentioned download directory. The path to it must be set in TARGET. This is an example setting:<br><br> | ||
| − | [[Image: snapeda_ne555_3_e.jpg|Download directory|none]]Image: A personal download directory. Sure you will be using your user name. If a matching file arrives there by download, TARGET picks it and puts it to the TARGET component data base.<br><br><br> | + | [[Image: snapeda_ne555_3_e.jpg|Download directory|none]]Image: A personal download directory in TARGET. Sure you will be using your user name. If a matching file arrives there by download, TARGET picks it and puts it to the TARGET component data base.<br><br><br> |
| − | |||
If the TARGET component browser is open, a TAB will be created showing "CXF SnapEDA". At the same time bottom left in the dialog a list is created representing all SnapEDA downloads: | If the TARGET component browser is open, a TAB will be created showing "CXF SnapEDA". At the same time bottom left in the dialog a list is created representing all SnapEDA downloads: | ||
| Line 42: | Line 43: | ||
= Search for a component at SnapEDA while the TARGET schematic is open = | = Search for a component at SnapEDA while the TARGET schematic is open = | ||
| − | In this situation you have the component symbol instantly at the cursor after downloading it from the SnapEDA site. You will be able to place it right away to the schematic. At the same time it is stored in the TARGET component database.<br><br> | + | In this situation you will have the component symbol instantly at the cursor after downloading it from the SnapEDA site. You will be able to place it right away to the schematic. At the same time it is stored in the TARGET component database.<br><br> |
| + | = Load a 3D model = | ||
| + | Any 3D model in STEP format (*.STEP or *.stp) can be added to an existing component. If SnapEDA provides a 3D model for the component in question, the process is easy. First download it from SnapEDA page:<br><br> | ||
| + | |||
| + | |||
| + | [[Image: snapeda_ne555_13.jpg|Load 3D model|none]]Image: Load a 3D model from the SnapEDA page.<br><br> | ||
| − | |||
| − | + | Now import it to the Part in TARGET: <br><br> | |
| − | |||
| − | |||
| − | |||
| + | [[Image: Add3Dmodel_e1_.jpg|3D edit|none]]Image: Left or right click [M2] into the 3D field opens the dialog for loading a 3D model in STEP format.<br><br> | ||
| + | Click near the coordinate system in the TARGET component browser (where you expect the 3D image to be) and select "Edit 3D..."<br><br> | ||
It is ''not'' necessary to create an "extruded polygon" as suggested by the intermediate dialog. | It is ''not'' necessary to create an "extruded polygon" as suggested by the intermediate dialog. | ||
| − | + | Click on the STP button at the bottom left to load a step file:<br><br><br> | |
| − | [[Image: | + | [[Image: Add3Dmodel_e2.jpg|Load STEP file|none]]Image: Load a 3D model in STEP format (*.stp or *.step) |
<br><br> | <br><br> | ||
| − | The STP button opens the | + | The STP button opens the dialog for loading a STEP file from your file browser. The step file will then appear as a single line in the dialog. Double click on this line opens again the dialog shown in the picture above and allows you to align the step file to the three axes of the coordinate system: X red, Y green, Z blue. Now the 3D model is assigned to the component housing and the image appears in the 3D view of TARGET. If you delete this line, the 3D model is gone again and you might choose a different 3D model.<br><br><br> |
| + | |||
| + | |||
| + | That is how it shows up in TARGET 3001! <br><br> | ||
| + | |||
| + | [[Image:snapeda_ne555_14.jpg|STEP file loaded|none]]Image: A 3D model in STEP format (*.stp or *.step) has been added to symbol and footprint.<br><br><br> | ||
| + | |||
| + | |||
| − | + | [[fr:SnapEDA]] [[de: SnapEDA]] | |
Latest revision as of 17:27, 16 November 2020
SnapEDA is a search engine for electronic components including CAD data and data sheets.
Drag and drop your desired part to your TARGET 3001! design. It is that easy. Once a component is downloaded, its CAD data instantly are taken to the TARGET 3001! component data base so you have it for further projects too.
 |
Video 2:23 min |
Search a part in TARGET and redirect the request to SnapEDA
If you are looking for a component in the TARGET component browser and wouldn't find it, simply press the adjacent button "SnapEDA" in order to redirect your request there:

The SnapEDA website immediately searches for this component and shows the corresponding results in a list. Select a component and click on the button in the column "Part", see arrow. If there is a symbol in the column 3D, a 3D model will be loaded automatically.

You must save the download. Use your default Windows download directory as storage location. Tell TARGET the path to it.

First select the TARGET 3001! format from the list:

Now save the file to your standard download directory:

TARGET monitors the mentioned download directory. The path to it must be set in TARGET. This is an example setting:

If the TARGET component browser is open, a TAB will be created showing "CXF SnapEDA". At the same time bottom left in the dialog a list is created representing all SnapEDA downloads:

Search for a component at SnapEDA while the TARGET schematic is open
In this situation you will have the component symbol instantly at the cursor after downloading it from the SnapEDA site. You will be able to place it right away to the schematic. At the same time it is stored in the TARGET component database.
Load a 3D model
Any 3D model in STEP format (*.STEP or *.stp) can be added to an existing component. If SnapEDA provides a 3D model for the component in question, the process is easy. First download it from SnapEDA page:

Now import it to the Part in TARGET:

Click near the coordinate system in the TARGET component browser (where you expect the 3D image to be) and select "Edit 3D..."
It is not necessary to create an "extruded polygon" as suggested by the intermediate dialog.
Click on the STP button at the bottom left to load a step file:

The STP button opens the dialog for loading a STEP file from your file browser. The step file will then appear as a single line in the dialog. Double click on this line opens again the dialog shown in the picture above and allows you to align the step file to the three axes of the coordinate system: X red, Y green, Z blue. Now the 3D model is assigned to the component housing and the image appears in the 3D view of TARGET. If you delete this line, the 3D model is gone again and you might choose a different 3D model.
That is how it shows up in TARGET 3001!
