

Electra

Shape Based PCB Autorouter
Preface
TARGET 3001! contains two internal autorouters, the Contour Autorouter and the Hybrid Autorouter. Additionally an interface for ELECTRA, a powerful external autorouter can instantly be used in every TARGET 3001! edition. Fully licensed ELECTRA versions can separately be purchased, prices see below. ELECTRA is suitable for the more advanced and complex projects. It is working very quickly and reaches high completion rates. ELECTRA is a product of Konekt SPRL, Belgium, www.konekt.com

How to start ELECTRA in TARGET 3001!?
Install ELECTRA to a directory of your choice. Open TARGET 3001! and open layout menu:
Actions/Automatisms and assistants/Autorouter/ELECTRA auto router... [Ctrl]+[R].

The dialog "External Autorouter". Open the TAB Algorithm. Please find the line to enter the path to the Electra.exe beneath: External router, program file: Click the button with the drop down arrow in order to open your Windows browser.

You can have the electra.exe in any directory of your choice. You only need to point TARGET there by entering the path to this line.
If you purchase a license by us, you always will receive the latest version.
ELECTRA V8 (current main version)
v8.05 (Sept 2020)
Info about V8 (PDF)
- Routing engine has a new push and shove routing pass that is now applied automatically on highly congested boards to resolve spacing violations more quickly than by rerouting nets. This improves performance and completion rate.
- Multi-Routing strategy providing an easy method to define and run multiple routing strategies within the same session.
- Advanced Routing strategy, use TCL with DO file extensions to control the strategy with for_loop, if statement, etc…
ELECTRA V7
v7.00 (Jan 2018)
- User defined "from-to" for redefining the net topology
- New general purpose single layer no-via router
- Controlled flow to route decoupling capacitor with tracks and the rest with via to planes
- New “gloss” command to review existing routes to remove extra bends and redundant vias without rerouting like “clean”
- New report tab in log windows with a spreadsheet view of sortable net routing values
- Display of antigap shape on plane layer to visually verify plane hooks
- Better handling of TCL break when interrupting a routing script
- Fixes to Constraint Rules dialog box generating DO file (representation of same net clearance type)
- Updated User’s guide
- Help/About includes a link to the latest version
- Interface can process Differential Pairs
ELECTRA V6

New in ELECTRA V6:
Main approach: Improvements to the differential pair and minimum length autorouting. For illustration, see some screenshots taken while developing the flow for defining minimum length constraints based on the user CLK nets min length requirements.
Further news:
- Native Electra for Linux
- Automatic chamfering of tuned nets supported
- Specify min/max length amplitude for serpentine pattern (PCB/Class/Net levels)
- Control for serpentine length gap
- "Report network" function to show length stat details of selected nets
- Differential pair autorouter to support pre-fanout
- Fanout in zigzag pattern
- Tune command to autoadjust in-place routed matched/min length nets
- Enable/disable diff pairs routing to route as single nets
- Protect/unportect command to protect diff pairs only
- Write routes by type (protect | unprotect | select)
- Improved net length reporting
ELECTRA V5

New in ELECTRA V5:
- Fast Pattern Router producing in everage 20% less total vias
- enhanced Mitering for long 45° diagonal
- Note: ELECTRA routs significantly quicker, if you waive the use of octagonal pads. Better use round or rectangular ones.
ELECTRA V4
NEW in V4:
- Interactive Contour Router with Push and Shove
- Dynamic Move and Compaction
- Adaptive Multi pass conflict reduction technology
- Advanced Constraints Editor
- Automatic definition and Routing of Differential Pairs
- Automatic lengthening and length matching by meandering
- Real-time Verification of DFM and High speed constraints
- Active flow: Edit Constraints, AutoRoute&Retry on preselected interconnects
- PCB CAD plug-in, Specctra® DSN format support
- Reasonable Cost of ownership
If you are purchasing ELECTRA with us, you always will receive the latest version. It is V4 at the moment..
ELECTRA V3
... was on the market only for a while. We at IBF haven't had it on our product line.
ELECTRA V2

What was new in V2?
- Extending rules hierarchy: PCB < Layer < Class < Class_layer < Net < Net_layer < Area
- Rules-by-Area (width and clearance by region)
- Especially useful around BGAs and fine SMDs
- Interactive region editor to define area, width and clearance
- Rules-by-Area (width and clearance by region)
- Router Strategy Dialog
- New Graphical User Interface
- Report of routing via styles
- Improved layout display
- Polygon outline and blind/buried via display
- Reset and restart - Try different routing strategies with a reset command that deletes all routing
- Simplified and robust licensing
- For node-locked licenses, Site and MID codes are now unaffected by changes to BIOS, MB and OS
- One step configuration upgrade
- Hassle-free floating license setup
- Improved User Guide with Tech Tips section
How much is an ELECTRA license?
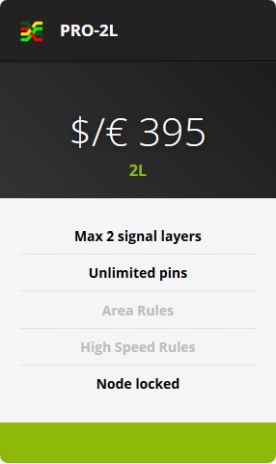
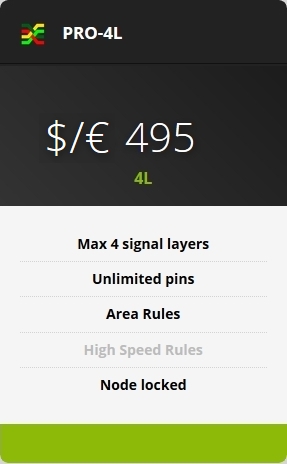
All configurations support unlimited power and ground layers. For instance, Route 2L supports two signal layers plus unlimited power and ground layers. All configurations include advanced rule support and mitering capability. Pricing is for node-locked licenses on Windows operating system.
Purchase a license in the TARGET 3001! SHOP Look for this logo: ![]()
Have a short overview here:
New versions:

Please note: $ = € German VAT (19% will be added!)
Package and freight: Within the European Community please add EUR 23.80 (VAT 19% included). Outside the EC= EUR 25.00
Payment: Cash in advance by Credit Card (VISA, American Express or Mastercard), by bank transfer (SEPA) or by PayPal towards target@ibfriedrich.com
Companies located in the European Community providing a VAT registration code will be charged ex VAT.
Private customers located in the European Community without a VAT registration code will be charged with a 19% VAT.
Companies and private customers located outside the European Community will be charged ex VAT.
How to activate your license
A purchased Electra licence is fixed to one computer (node locked licene) while an activation code is required. Please press the caps lock key and double click the electra.exe. It runs for 2 days after first use. The ELECTRA licensing dialog will open to get the Site Code as well as the Machine IDentity Code (MID). please send both to target@ibfriedrich.com, our eMail adress at IBF. We will send over the activation code to you by eMail soonest.
Further information: Konekt.com or see the ELECTRA user guide.
How to migrate ELECTRA to a new PC
The most recent best practise you'll find on the Electra page: See the ELECTRA pricing site at "Licensing information" where the "How to Transfer your License" - link is:
http://konekt.com/wp/pricing/
1. Install the ELECTRA download to the new PC "B" and note the new Site Code to a piece of paper.
2. Go back to old PC "A", hold the "shift key" while launching ELECTRA, the old license dialog shows up.
3. Select "Transfer license" and enter the Site Code of new PC "B" to the field to the right.

Image: The Electra license dialog
4. Hit Continue>> so that the new activation code will be generated.

Image: New Activation Code
5. Save the new activation code as a small text file on any medium (e.g. USB stick) in order to carry it to computer B. You might also send it in an email to yourself to the new computer (to transfer it properly. Or maybe use your smartphone...
6. Enter the new activation code to the field "Activation code" on the new PC.Done.
If a transfer from the old computer is no longer possible, e.g. after a computer crash, then you must request a new activation from us. If you own the current Electra version or even one year after purchase, this service is free of charge once. Otherwise you have to pay to update to the latest version of Electra to get new codes. These are the service rules of the manufacturer of the Electra router, we have no influence on it.
ELECTRA Update
An Update within the current main ELECTRA version number is free of charge. An upgrade from lower editions or earlier main versions is a purchase.
You can easily update your purchased current version of ELECTRA by exchanging the electra.exe file. This is how you get it:

Image ELECTRA Update. Link to the ELECTRA website: https://konekt.com/
Save the setup.exe provided by the link to a directory of your choice. A double click upon it later opens the install shield. During the setup you will get asked where to install the electra.exe. Now choose the same destination (the same path) so that TARGET 3001! later will be able to find the new exe-file.
How does ELECTRA produce a PCB layout from my TARGET 3001! schematic?

After your schematic work in TARGET has finished, you would import your packages to the layout. Now you see a tangle of air wires (ratsnest), which now wait for disentangeling. ELECTRA asks TARGET 3001! to create a file in the DSN standard, which ELECTRA is able ro read in. The routing result which ELECTRA delivers is a session file (*.ses), which TARGET now is able to read in (see image to the left). This happens for TARGET users on button click. No bustling around in TARGET itself.
An example:

Image: A TARGET project unrouted. Then [Ctrl]+[R] pressed to open the dialog "External Autorouter".
No signal highlighted means: All signals will be used for routing. After pressing "Start" ELECTRA overtakes a *.dsn file and routs it. After ELECTRA has done its work it simply needs to be saved, so that instantly a session file (*.ses) will be made out of it. The image of the routing result in ELECTRA can be closed:

Image: Save the *.dsn file and so create the *.ses file.

Image: Accept the proposed saving directory and press "Save".

Image: Accepts the routed project to TARGET by saying "Yes".

Image: The routed project in TARGET 3001!. All tracks can now be manupulated as usually in TARGET.
What do the tabs of the dialog for external auto routers in TARGET 3001! mean?
In Tab "Signals" all unrouted signals appear in a list. Which signal you'dlike to have routed please select by highlighting its signal name in the list. Using the [Ctrl] key you can highlight several signals at the same time. Clicking it again will unhighlight it. With the buttons "Select all", "Deselect all", you'll have them on one strike. If you press "Start", without having highlighted any signal, all signals get routed.

Image: The "Signals" tab in the External autorouter dialog
In section "Signal tracks" you can enter to the line "Minimum Track width:". This value is taken at minimum while routing even if you define it smaller in the schematic signal. But if you define a bigger value in the schematic signal than the one entered here, the bigger one will be taken. The same with the minimum spacing of tracks. At first the distance copper to copper counts. In the project test dialog the aura can be added. Vias also can achieve minimum width values regarding the drill hole. The width of an annular copper ring around the drill hole can be defined. An annular ring exists if a 4mm copper circle is center drilled by a 2mm drill. Around the hole a ring of 1mm width remains. The minimum entries here control the size of the vias.
The tab "Algorithm" allows strategic settings. Memory structures (as far as used in the layout) might be routed first in order not to have too many obstacles later. The same with fan outs at packages having a narrow pinout. Fan outs allow an escape to the opposite layer with a differently preferred routing direction. During disentangeling passes connections are made, during optimization passes the track lengthes are tightened.

Image: Tab "Algorithm" in the External autorouter dialog
Set the path to the electra exe You can tell TARTET 3001! where the electra exe is located. Enter the path to the line: "External Router, program-file" so that TARGET 3001! will start it.
In tab "Route layers" please select a certain routing layer and in the area to the right define how the layer shall be used for which signals. Preferred routing direction means the preferred direction of the tracks on one layer face: horizontally or vertically.

Image: Tab "Route layers" in the External autorouter dialog
Good if for every layer a certain preferred routing direction is defined. Routing in all directions upon one layer can be avoided that way. At the same time one can predefine certain layers for certain signals or forbid them for certain signals. A Route prohibition area is defined on a certain layer having exactly this function.
.