Electra: Difference between revisions
No edit summary |
No edit summary |
||
| Line 1: | Line 1: | ||
{|cellpadding="15" | |||
|[[file:Electra250.png|alt="Electra autorouter"]]||<span style="color:#FF0000;"><big>'''FREE: ELECTRA 250 pin version<br>in every TARGET 3001! edition'''</big></span><br><br>[[Image:videoicon.png]] <big>[http://www.target-3001.de/target/video/english/electra/index.htm '''ELECTRA video'''</big> <small>(mute)]</small> | |||
|} | |||
== ELECTRA Version 2.0.0 == | |||
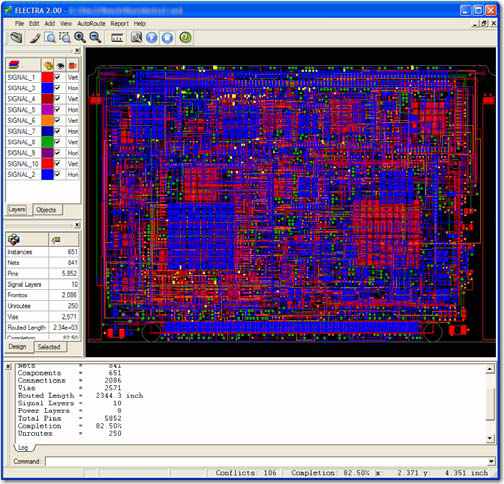
[[Image:electra2screenshot.jpg]]<br><br> | |||
<big>'''What's new?'''</big> | |||
*Extending rules hierarchy: PCB < Layer < Class < Class_layer < Net < Net_layer < Area | |||
**[[ELECTRA 2 Rules-by-Area|Rules-by-Area (width and clearance by region)]] | |||
***Especially useful around BGAs and fine SMDs | |||
***Interactive region editor to define area, width and clearance | |||
*[[ELECTRA 2 Router Strategy Dialog|Router Strategy Dialog]] | |||
*[[ELECTRA 2 New Graphical User Interface|New Graphical User Interface]] | |||
*[[ELECTRA 2 Report of routing via styles|Report of routing via styles]] | |||
*Improved layout display | |||
**Polygon outline and blind/buried via display | |||
*Reset and restart - Try different routing strategies with a reset command that deletes all routing | |||
*Simplified and robust licensing | |||
**For node-locked licenses, Site and MID codes are now unaffected by changes to BIOS, MB and OS | |||
**One step configuration upgrade | |||
** Hassle-free floating license setup | |||
*Improved User Guide with Tech Tips section | |||
. | |||
== How do I get ELECTRA to produce a PCB layout from my TARGET 3001! schematic? == | |||
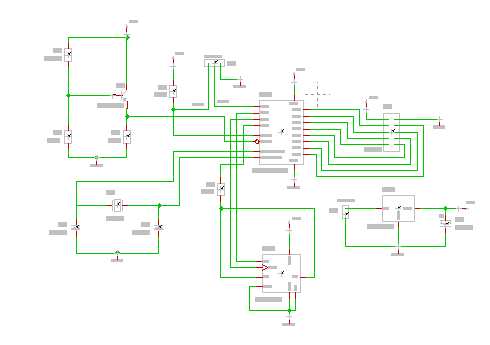
That's the schematic from the TARGET 3001! Demo Project [[media:Pic.t3001|PIC.T3001]]: | |||
[[Image:electra1.jpg|none|]]<br><br> | |||
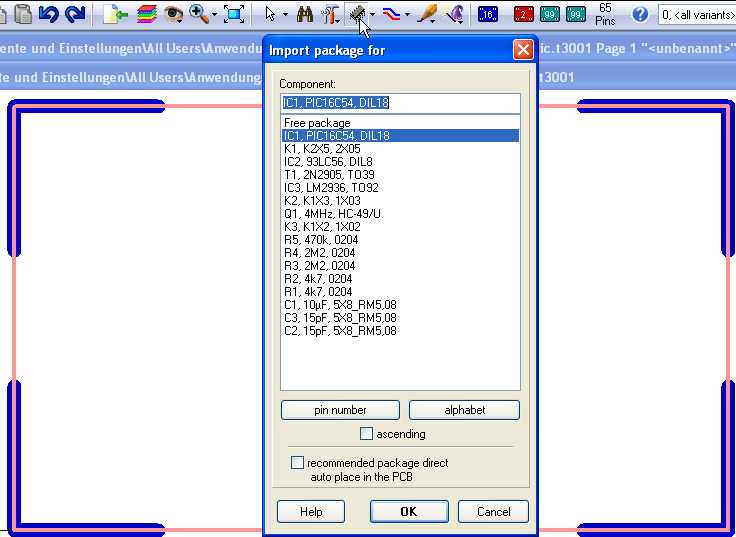
When you switch over to the layout view, you should see a prepared outline (drawn on layer 23). Now you have to import and place the packages. You might use the auto placer by ticking the box in the dialog: | |||
[[Image:electra2.jpg|none|]]<br><br> | |||
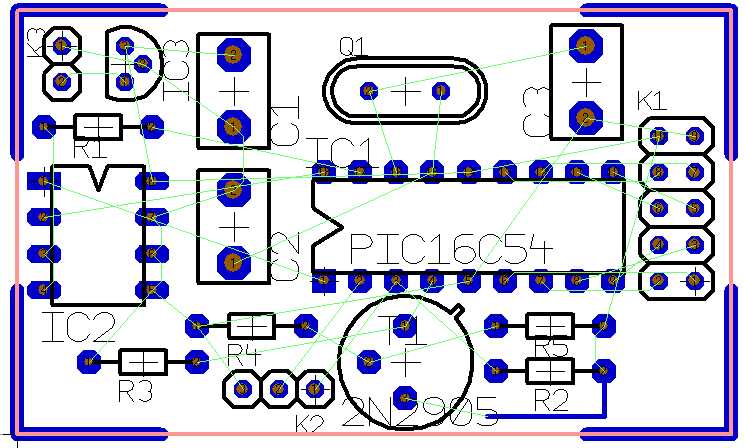
After proper placement you should see the ratsnest. | |||
[[Image:electra3.jpg|none|]]<br><br> | |||
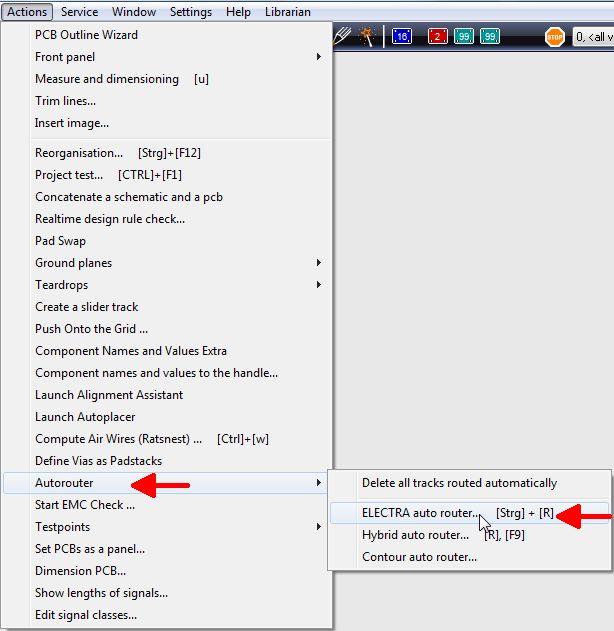
Now you will have to rout them. The ELECTRA Autorouter is an option which requires an extra purchase. Nevertheless you have a demo version of the router within every normal TARGET 3001! installation (freeware also). Please see menu Actions/Autorouter/External auto router... | |||
[[Image:electra4.jpg|none|]]<br><br> | |||
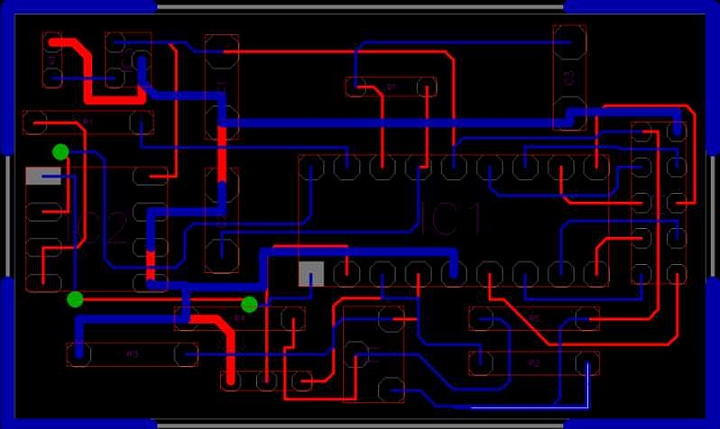
You can see the routing result (this is ELECTRA screen!)... | |||
[[Image:electra5.jpg|none|]]<br><br> | |||
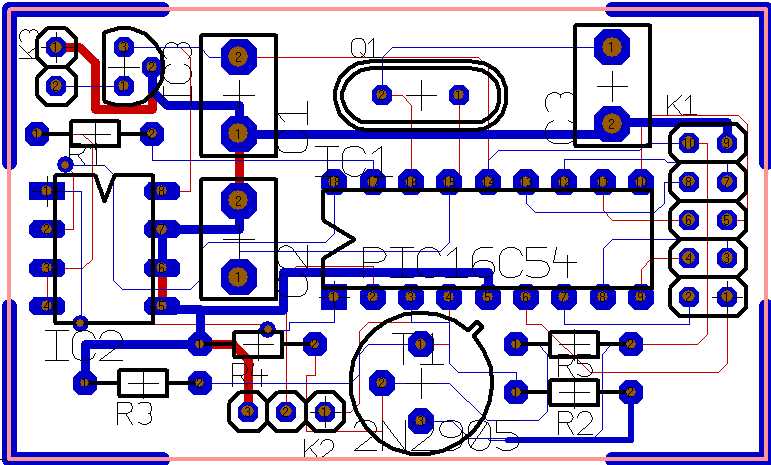
...but in the demo version of ELECTRA you can not take it back to the TARGET 3001! layout. Sure you can take it as a default for redrawing it in TARGET 3001!. Having a licensed version of ELECTRA the overtake of an Electra-Routing result is a matter of seconds. See it here: | |||
[[Image:electra6.jpg|none|]]<br><br> | |||
== The tabs of the dialog for external auto routers == | |||
In Tab '''"Signals"''' all unrouted signals appear in a list. Which signal you'dlike to have routed please select by highlighting its signal name in the list. Using the [Ctrl] key you can highlight several signals at the same time. Clicking it again will unhighlight it. With the buttons "Select all", "Deselect all", you'll have them on one strike. If you press "Start", without having highlighted any signal, all signals get routed.<br><br> | |||
[[Image:ExternDlg1_e.jpg]]<br>Image: The "Signals" tab in the ''External autorouter'' dialog<br><br> | |||
In section "Signal tracks" you can enter to the line "Minimum Track width:". This value is taken at minimum while routing even if you define it smaller in the schematic signal. But if you define a bigger value in the schematic signal than the one entered here, the bigger one will be taken. The same with the minimum spacing of tracks. At first the distance copper to copper counts. In the project test dialog the aura can be added. Vias also can achieve minimum width values regarding the drill hole. The width of an annular copper ring around the drill hole can be defined. An annular ring exists if a 4mm copper circle is center drilled by a 2mm drill. Around the hole a ring of 1mm width remains. The minimum entries here control the size of the vias.<br><br>The tab '''"Algorithm"''' allows strategic settings. Memory structures (as far as used in the layout) might be routed first in order not to have too many obstacles later. Gleiches gilt für Fluchtdukos bei Bauteilen mit engem Pinout. In der Entflechtphase werden die Verbindungen überschneidungsfrei hergestellt, in der Optimierungsphase werden die Leiterbahnen gestrafft.<br><br> | |||
[[Image:ExternDlg2_e.jpg]]<br>Image: Tab "Algorithmus" im externen Autorouter-Dialog<br><br>Sie können TARGET mitteilen, wo sich die ELECTRA exe befindet, die justament gestartet werden soll geben Sie den Pfad an in der Zeile: "Externer Autoreuter Pragramm-File". | |||
Im Tab '''"Route-Ebenen"''' können Sie links eine bestimmte Ebene wählen und rechts bestimmen, wie diese Ebene für welche Signale nutzbar sein soll. Vorzugsrichtung meint die vorrangige Richtung der Bahnverlegung, waagerecht oder senkrecht. | |||
[[Image:ExternDlg3_e.jpg]]<br>Image: Tab "Route-Ebenen" im externen Autorouter - Dialog<br><br><br> | |||
Gut ist, wenn für jede Ebene eine bestimmte Vorzugsrichtung bestimmt ist. Man vermeidet dadurch auf einer Ebene kreuz und quer zu routen was sehr bald die Wege versperren würde. Gleichzeitig kann man bestimmte Ebenen für bestimmte Signale vorsehen oder für bestimmte Signale sperren. Eine [[Autorouter#Das_Einrichten_von_Route-Verbotszonen|Route-Verbotszone]] bestimmt man auf einem separaten Layer mit eben dieser Layer-Funktion.<br><br> | |||
== The tabs of the dialog for external auto routers == | == The tabs of the dialog for external auto routers == | ||
| Line 15: | Line 101: | ||
Good if for every layer a certain preferred routing direction is defined. Rrouting in all directions upon one layer can be avoided that way. At the same time one can predefine certain layers for certain signals or forbid them for certain signals. A Route prohibition area is defined on a certain layer having exactly this function.<br><br> | Good if for every layer a certain preferred routing direction is defined. Rrouting in all directions upon one layer can be avoided that way. At the same time one can predefine certain layers for certain signals or forbid them for certain signals. A Route prohibition area is defined on a certain layer having exactly this function.<br><br> | ||
== Try it for free == | |||
TARGET 3001! contains two internal autorouters, the contour router and the hybrid router. From TARGET-Version V15 a 250 Pin version of the power autorouter ELECTRA is delivered free of charge. You can create real production data within the 250 pin limit. Full ELECTRA versions can separately be purchased, prices see below. ELECTRA is suitable for the more advanced and complex projects. It is working very quickly and reaches high completion rates.<br><br><br>Start ELECTRA in '''layout''' menu:<br> | |||
"Actions/Autorouter/ELECTRA auto router" | |||
In the flashing dialog please do individual settings. The tab "Algorithm" allows setting the path to the desired electra.exe: | |||
[[Image:electrapath.jpg|none|Set the path to the electra.exe within this dialog]]<br><br> | |||
[http://www.target-3001.de/electra250/ELECTRA.exe Download ELECTRA_250.exe]<br><br> | |||
'''Please note:''' If you already own a purchased ELECTRA V1- or V2-Version, don't overwrite it by installation of the above ELECTRA 250 Pin version<br><br> | |||
== What does ELECTRA cost? == | |||
All configurations support unlimited power and ground layers. For instance, Route 2L supports two signal layers plus unlimited power and ground layers. All configurations include advanced rule support and mitering capability. Pricing is for node-locked licenses on Windows operating system. | |||
'''Node lock:''' The individual license is node locked to one individual PC by a coding system. It can migrate to a new machine. | |||
'''Multiuser license:''' By request.<br> | |||
'''New versions ELECTRA Version 2:'''<center> | |||
{|border="0" cellpadding="20" | |||
|- | |||
|[[File:Electra_4lneu_e.png|link=http://server.ibfriedrich.com/wiki/ibfwikien/index.php/Shop]]||[[File:Electra_ulneu_e.png|link=http://server.ibfriedrich.com/wiki/ibfwikien/index.php/Shop]] | |||
|- | |||
|} | |||
</center> | |||
prices include 19% German VAT and freight charges within Germany. To the [https://www.ibfriedrich.com/shop/shop1.htm?lang=EN SHOP] | |||
'''Updates ELECTRA Version 2 (updating the 1.x.x. version):''' | |||
{|border="0" cellpadding="15" | |||
|- | |||
|ROUTE 4L - update from V1||'''EUR 208.25''' | |||
|- | |||
|ROUTE UL - update from V1||'''EUR 446.25''' | |||
|} | |||
'''Package and freight:''' Within the European Community please add EUR 12.30 (VAT 19% included). Outside the EC= EUR 18.00<br> | |||
'''Payment:''' Cash in advance by Credit Card (VISA, American Express or Mastercard) or by bank transfer (SEPA).<br> | |||
Companies located in the European Community providing a VAT registration number will be charged ex VAT. | |||
Companies and private customers located outside the European Community will be charged ex VAT. | |||
<br><br> | |||
== How to migrate ELECTRA to a new PC == | |||
Prior to launching ELECTRA you should activate the CapsLock key, this will force the startup license dialog to show up when clicking the electra.exe. In order to transfer a node-locked license from one computer to another, tick the radio button "Transfer license" and press "Continue>>". You also have to enter the original activation code for security reasons (this will prevent accidental or unauthorized license transfer). The license transfer now is managed in four steps:<br><br>[[image:ElectraStartDLG.jpg|left]]<br><br>*'''Initial situation:''' Unlocked application is located on source computer A (already unlocked with activation code A) and the client wants to transfer his license to target computer B. | |||
*'''Step 1:''' The user should install and run ELECTRA on target computer B. | |||
*'''Step 2:''' ELECTRA on target computer (B) will display activation dialog box with "Site code B" which is different from "Site code A". "Activation code B" will be required for program unlocking. | |||
*'''Step 3:''' The user should run unlocked application (computer A), set "Activation code" field to previously issued "Activation code A" (which was initially used for program unlocking on computer A), set "New Site code" field to "Site code B" and press "Continue >>" button. | |||
*'''Step 4:''' Protected ELECTRA will display dialog box with "Activation code B" which she/he should use to unlock the protected application on computer B. | |||
*'''Resulting situation:''' License will be removed from computer A and transferred to computer B.<br><br><br><br><br><br><br><br> | |||
== ELECTRA Update == | |||
You can easily update your purchased version of ELECTRA II by exchanging the electra.exe file. Its location please find according to the path shown in the image above (see chapter 3: "Try it for free"). | |||
The latest ELECTRA II you can download here: | |||
'''[http://www.konekt.com/dld2/product/setup.exe ELECTRA setup.exe]''' | |||
Save the setup.exe provided by the link to a directory of your choice. A double click upon it later opens the install shield. During the setup you will get asked where to install the electra.exe. Now choose the above mentioned destination so that TARGET 3001! later will be able to find the new exe-file. | |||
<br><br><br> | |||
. | |||
[[de:ELECTRA]] | |||
[[fr:Electra]] | |||
[[category:Partner]] | |||
[[category:Autorouter]] | |||
[[Category:Homepage]] | |||
Revision as of 15:24, 24 June 2013
 |
FREE: ELECTRA 250 pin version in every TARGET 3001! edition |
ELECTRA Version 2.0.0
What's new?
- Extending rules hierarchy: PCB < Layer < Class < Class_layer < Net < Net_layer < Area
- Rules-by-Area (width and clearance by region)
- Especially useful around BGAs and fine SMDs
- Interactive region editor to define area, width and clearance
- Rules-by-Area (width and clearance by region)
- Router Strategy Dialog
- New Graphical User Interface
- Report of routing via styles
- Improved layout display
- Polygon outline and blind/buried via display
- Reset and restart - Try different routing strategies with a reset command that deletes all routing
- Simplified and robust licensing
- For node-locked licenses, Site and MID codes are now unaffected by changes to BIOS, MB and OS
- One step configuration upgrade
- Hassle-free floating license setup
- Improved User Guide with Tech Tips section
.
How do I get ELECTRA to produce a PCB layout from my TARGET 3001! schematic?
That's the schematic from the TARGET 3001! Demo Project PIC.T3001:
When you switch over to the layout view, you should see a prepared outline (drawn on layer 23). Now you have to import and place the packages. You might use the auto placer by ticking the box in the dialog:
After proper placement you should see the ratsnest.
Now you will have to rout them. The ELECTRA Autorouter is an option which requires an extra purchase. Nevertheless you have a demo version of the router within every normal TARGET 3001! installation (freeware also). Please see menu Actions/Autorouter/External auto router...
You can see the routing result (this is ELECTRA screen!)...
...but in the demo version of ELECTRA you can not take it back to the TARGET 3001! layout. Sure you can take it as a default for redrawing it in TARGET 3001!. Having a licensed version of ELECTRA the overtake of an Electra-Routing result is a matter of seconds. See it here:
The tabs of the dialog for external auto routers
In Tab "Signals" all unrouted signals appear in a list. Which signal you'dlike to have routed please select by highlighting its signal name in the list. Using the [Ctrl] key you can highlight several signals at the same time. Clicking it again will unhighlight it. With the buttons "Select all", "Deselect all", you'll have them on one strike. If you press "Start", without having highlighted any signal, all signals get routed.
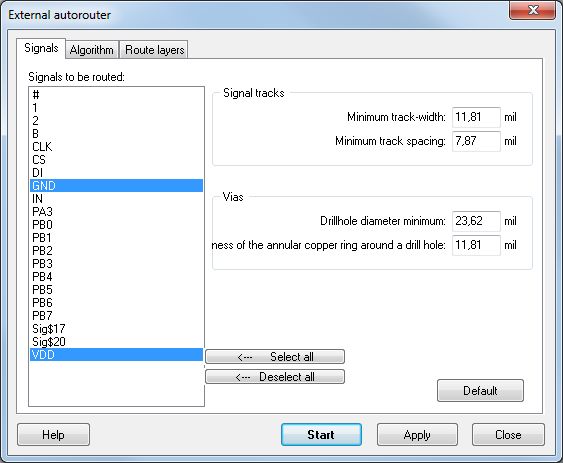
Image: The "Signals" tab in the External autorouter dialog
In section "Signal tracks" you can enter to the line "Minimum Track width:". This value is taken at minimum while routing even if you define it smaller in the schematic signal. But if you define a bigger value in the schematic signal than the one entered here, the bigger one will be taken. The same with the minimum spacing of tracks. At first the distance copper to copper counts. In the project test dialog the aura can be added. Vias also can achieve minimum width values regarding the drill hole. The width of an annular copper ring around the drill hole can be defined. An annular ring exists if a 4mm copper circle is center drilled by a 2mm drill. Around the hole a ring of 1mm width remains. The minimum entries here control the size of the vias.
The tab "Algorithm" allows strategic settings. Memory structures (as far as used in the layout) might be routed first in order not to have too many obstacles later. Gleiches gilt für Fluchtdukos bei Bauteilen mit engem Pinout. In der Entflechtphase werden die Verbindungen überschneidungsfrei hergestellt, in der Optimierungsphase werden die Leiterbahnen gestrafft.
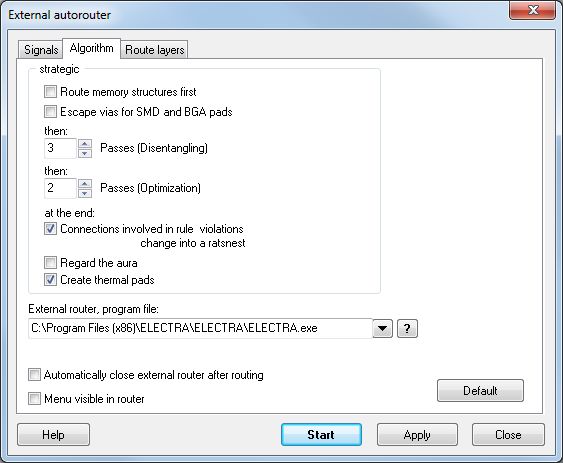
Image: Tab "Algorithmus" im externen Autorouter-Dialog
Sie können TARGET mitteilen, wo sich die ELECTRA exe befindet, die justament gestartet werden soll geben Sie den Pfad an in der Zeile: "Externer Autoreuter Pragramm-File".
Im Tab "Route-Ebenen" können Sie links eine bestimmte Ebene wählen und rechts bestimmen, wie diese Ebene für welche Signale nutzbar sein soll. Vorzugsrichtung meint die vorrangige Richtung der Bahnverlegung, waagerecht oder senkrecht.
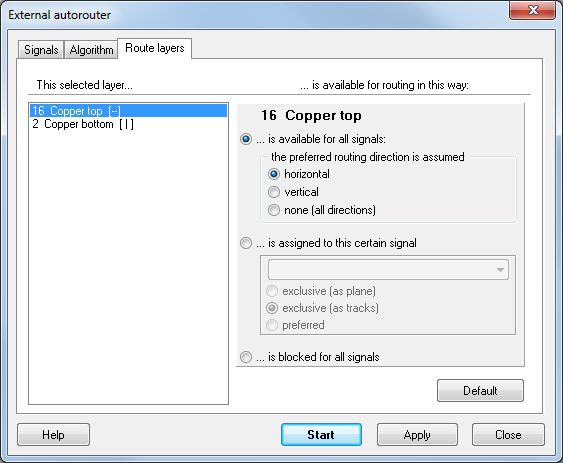
Image: Tab "Route-Ebenen" im externen Autorouter - Dialog
Gut ist, wenn für jede Ebene eine bestimmte Vorzugsrichtung bestimmt ist. Man vermeidet dadurch auf einer Ebene kreuz und quer zu routen was sehr bald die Wege versperren würde. Gleichzeitig kann man bestimmte Ebenen für bestimmte Signale vorsehen oder für bestimmte Signale sperren. Eine Route-Verbotszone bestimmt man auf einem separaten Layer mit eben dieser Layer-Funktion.
The tabs of the dialog for external auto routers
In Tab "Signals" all unrouted signals appear in a list. Which signal you'dlike to have routed please select by highlighting its signal name in the list. Using the [Ctrl] key you can highlight several signals at the same time. Clicking it again will unhighlight it. With the buttons "Select all", "Deselect all", you'll have them on one strike. If you press "Start", without having highlighted any signal, all signals get routed.

Image: The "Signals" tab in the External autorouter dialog
In section "Signal tracks" you can enter to the line "Minimum Track width:". This value is taken at minimum while routing even if you define it smaller in the schematic signal. But if you define a bigger value in the schematic signal than the one entered here, the bigger one will be taken. The same with the minimum spacing of tracks. At first the distance copper to copper counts. In the project test dialog the aura can be added. Vias also can achieve minimum width values regarding the drill hole. The width of an annular copper ring around the drill hole can be defined. An annular ring exists if a 4mm copper circle is center drilled by a 2mm drill. Around the hole a ring of 1mm width remains. The minimum entries here control the size of the vias.
The tab "Algorithm" allows strategic settings. Memory structures (as far as used in the layout) might be routed first in order not to have too many obstacles later. The same with fan outs at packages having a narrow pinout. Fan outs allow an escape to the opposite layer with a differently preferred routing direction. During disentangeling passes connections are made, during optimization passes the track lengthes are tightened.

Image: Tab "Algorithm" in the External autorouter dialog
Set the path to the electra exe You can tell TARTET 3001! where the electra exe is located. Enter the path to the line: "External Router, program-file" so that TARGET 3001! will start it.
In tab "Route layers" please select a certain routing layer and in the area to the right define how the layer shall be used for which signals. Preferred routing direction means the preferred direction of the tracks on one layer face: horizontally or vertically.

Image: Tab "Route layers" in the External autorouter dialog
Good if for every layer a certain preferred routing direction is defined. Rrouting in all directions upon one layer can be avoided that way. At the same time one can predefine certain layers for certain signals or forbid them for certain signals. A Route prohibition area is defined on a certain layer having exactly this function.
Try it for free
TARGET 3001! contains two internal autorouters, the contour router and the hybrid router. From TARGET-Version V15 a 250 Pin version of the power autorouter ELECTRA is delivered free of charge. You can create real production data within the 250 pin limit. Full ELECTRA versions can separately be purchased, prices see below. ELECTRA is suitable for the more advanced and complex projects. It is working very quickly and reaches high completion rates.
Start ELECTRA in layout menu:
"Actions/Autorouter/ELECTRA auto router"
In the flashing dialog please do individual settings. The tab "Algorithm" allows setting the path to the desired electra.exe:
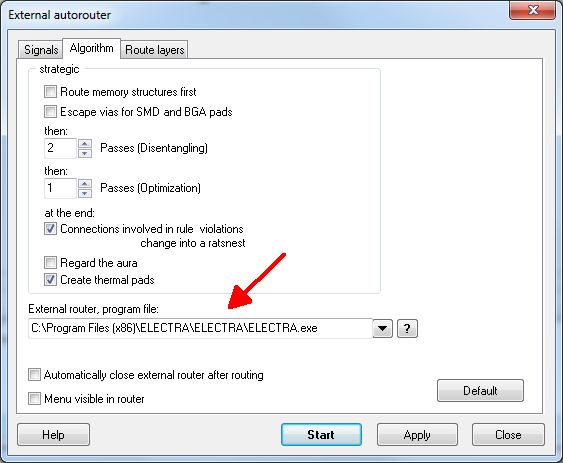
Please note: If you already own a purchased ELECTRA V1- or V2-Version, don't overwrite it by installation of the above ELECTRA 250 Pin version
What does ELECTRA cost?
All configurations support unlimited power and ground layers. For instance, Route 2L supports two signal layers plus unlimited power and ground layers. All configurations include advanced rule support and mitering capability. Pricing is for node-locked licenses on Windows operating system.
Node lock: The individual license is node locked to one individual PC by a coding system. It can migrate to a new machine.
Multiuser license: By request.
New versions ELECTRA Version 2:
 |

|
prices include 19% German VAT and freight charges within Germany. To the SHOP
Updates ELECTRA Version 2 (updating the 1.x.x. version):
| ROUTE 4L - update from V1 | EUR 208.25 |
| ROUTE UL - update from V1 | EUR 446.25 |
Package and freight: Within the European Community please add EUR 12.30 (VAT 19% included). Outside the EC= EUR 18.00
Payment: Cash in advance by Credit Card (VISA, American Express or Mastercard) or by bank transfer (SEPA).
Companies located in the European Community providing a VAT registration number will be charged ex VAT.
Companies and private customers located outside the European Community will be charged ex VAT.
How to migrate ELECTRA to a new PC
Prior to launching ELECTRA you should activate the CapsLock key, this will force the startup license dialog to show up when clicking the electra.exe. In order to transfer a node-locked license from one computer to another, tick the radio button "Transfer license" and press "Continue>>". You also have to enter the original activation code for security reasons (this will prevent accidental or unauthorized license transfer). The license transfer now is managed in four steps:
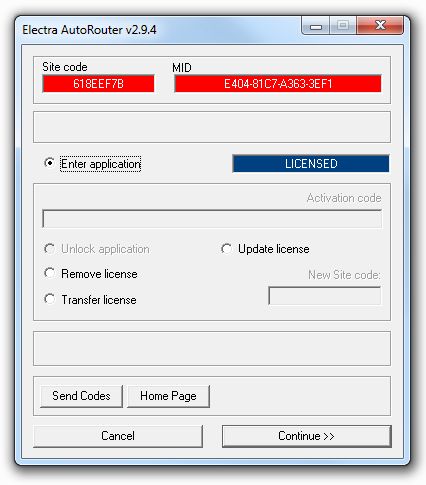
*Initial situation: Unlocked application is located on source computer A (already unlocked with activation code A) and the client wants to transfer his license to target computer B.
- Step 1: The user should install and run ELECTRA on target computer B.
- Step 2: ELECTRA on target computer (B) will display activation dialog box with "Site code B" which is different from "Site code A". "Activation code B" will be required for program unlocking.
- Step 3: The user should run unlocked application (computer A), set "Activation code" field to previously issued "Activation code A" (which was initially used for program unlocking on computer A), set "New Site code" field to "Site code B" and press "Continue >>" button.
- Step 4: Protected ELECTRA will display dialog box with "Activation code B" which she/he should use to unlock the protected application on computer B.
- Resulting situation: License will be removed from computer A and transferred to computer B.
ELECTRA Update
You can easily update your purchased version of ELECTRA II by exchanging the electra.exe file. Its location please find according to the path shown in the image above (see chapter 3: "Try it for free").
The latest ELECTRA II you can download here:
Save the setup.exe provided by the link to a directory of your choice. A double click upon it later opens the install shield. During the setup you will get asked where to install the electra.exe. Now choose the above mentioned destination so that TARGET 3001! later will be able to find the new exe-file.
.


