STEP 3D Import : Différence entre versions
(Page créée avec « <br><big><b><span style="color:#FF0000">Das Warten hat ein Ende: Der STEP-Import ist da!</span></b></big><br><br> <b>Importieren Sie 3D-Modelle aus Ihrem 3D-CAD System o... ») |
|||
| Ligne 1 : | Ligne 1 : | ||
| − | <br><big><b><span style="color:#FF0000"> | + | <br><big><b><span style="color:#FF0000">Nouveau en V17: Le STEP Import</span></b></big><br><br> |
| + | <b>Importez modéles 3D de votre CAO mechanique ou à partir du Web:</b> | ||
| − | + | *dans votre projet TARGET 3001! | |
| − | + | *dans votre base de données | |
| − | * | + | *dans le COMPONIVERSE |
| − | * | + | *pour votre STEP Export |
| − | * | ||
| − | * | ||
[[Image:stepimport_1.png]]<br> | [[Image:stepimport_1.png]]<br> | ||
| − | + | Importer données 3D de CAO en format *.stp pour TARGET 3001!<br><br> | |
| − | |||
| − | |||
| − | |||
| − | + | == Comment procéder? == | |
| − | |||
| − | |||
| − | |||
| − | |||
| + | * sauvegardez le <nowiki>*</nowiki>.stp 3D modéle of the desired part from the manufacturers website to a directory of your choice. | ||
| + | * activate the STEP import using the TARGET component browser. | ||
| + | * add the 3D model to your package | ||
<br><br> | <br><br> | ||
| − | [[Image: | + | [[Image:stepimport_2_f.png|500px]]<br>Image: In the TARGET 3001! data base you recognize that a certain component has no 3D model (e.g. manufacturer WAGO).<br>So we have a look at the WAGO website.<br><br> |
<br><br> | <br><br> | ||
| − | [[Image: | + | [[Image:stepimport_3_f.png|500px]]<br>Image: WAGO offer a 3D model of the part in STEP format, please download it (<nowiki>*</nowiki>.stp).<br><br> |
| + | STEP AP203 is monochrome. In most 3D CAD systems the view is in shades of gray. STEP AP214 is polychrome.<br>The color can be adapted later. Save the file to a directory, unzip it if needed.<br><br> | ||
| − | [[Image: | + | [[Image:stepimport_5_f.png|500px]]<br>Image: In the TARGET 3001! component browser click ('''[[M2]]''') on the image, where you would expect the 3D image. Now you need to create a user copy of the part.<br>You don't want to create an extruded model of its outline (because you want to have the STEP model). So deny this request.<br><br> |
<br><br> | <br><br> | ||
| − | [[Image: | + | [[Image:stepimport_6_f.png]]<br>Image: In the 3D editor press the STEP button (bottom left).<br><br> |
| − | |||
| − | |||
| − | [[Image: | + | [[Image:stepimport_7_f.png]]<br>Image: The dialog "Load and manipulate STEP data" opens. Press button: Load STEP file.<br><br> |
| − | [[Image: | + | [[Image:stepimport_8_f.png|500px]]<br>Image: Select the desired STEP file in order to open it in TARGET 3001!.<br>The STEP model comes in to the 3D editor and eventually needs being brought to position. So you need to align it.<br>In case the colour appears to you too weak in contrast you might change it in this dialog.<br><br> |
| − | [[Image: | + | [[Image:stepimport_10_f.png|500px]]<br>Image: In order to align the part you may flip it around X-, Y- or Z-axis and do the fine adjustment by the sliders. They represent X-, Y- and Z-axis (top to bottom)<br><br> |
| − | [[Image: | + | [[Image:stepimport_11_f.png|500px]]<br>Image: The OK button overtakes the model to the TARGET part in the way you have aligned it.<br><br> |
| − | [[Image: | + | [[Image:stepimport_12_f.png|500px]]<br>Image: The part in question used in the TARGET 3001! layout and visualized in the 3D view.<br><br> |
| − | [[Image: | + | [[Image:stepimport_13_f.png|500px]]<br>Image: In order to help other users, upload the part to the COMPONIVERSE if you like.<br><br> |
| − | [[de | + | [[de:STEP 3D Import]][[fr:STEP 3D Import]] |
Version du 9 octobre 2014 à 13:51
Nouveau en V17: Le STEP Import
Importez modéles 3D de votre CAO mechanique ou à partir du Web:
- dans votre projet TARGET 3001!
- dans votre base de données
- dans le COMPONIVERSE
- pour votre STEP Export
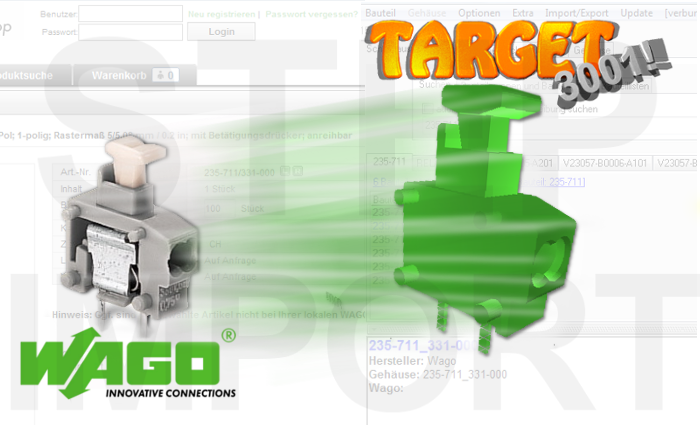
Importer données 3D de CAO en format *.stp pour TARGET 3001!
Comment procéder?
- sauvegardez le *.stp 3D modéle of the desired part from the manufacturers website to a directory of your choice.
- activate the STEP import using the TARGET component browser.
- add the 3D model to your package
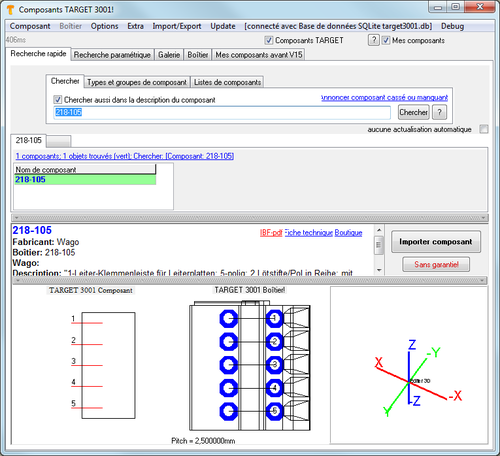
Image: In the TARGET 3001! data base you recognize that a certain component has no 3D model (e.g. manufacturer WAGO).
So we have a look at the WAGO website.
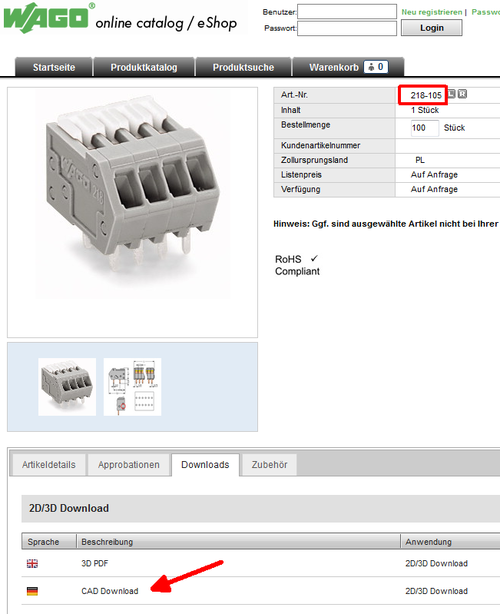
Image: WAGO offer a 3D model of the part in STEP format, please download it (*.stp).
STEP AP203 is monochrome. In most 3D CAD systems the view is in shades of gray. STEP AP214 is polychrome.
The color can be adapted later. Save the file to a directory, unzip it if needed.
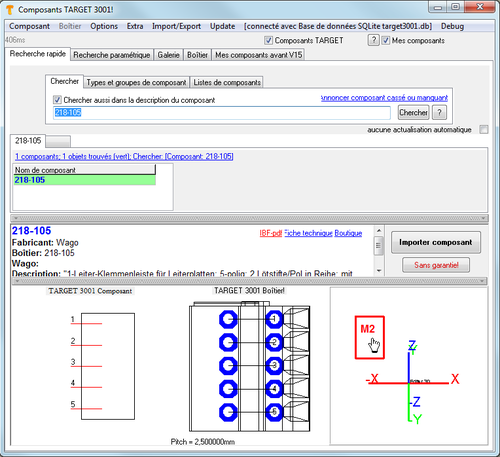
Image: In the TARGET 3001! component browser click (M2) on the image, where you would expect the 3D image. Now you need to create a user copy of the part.
You don't want to create an extruded model of its outline (because you want to have the STEP model). So deny this request.
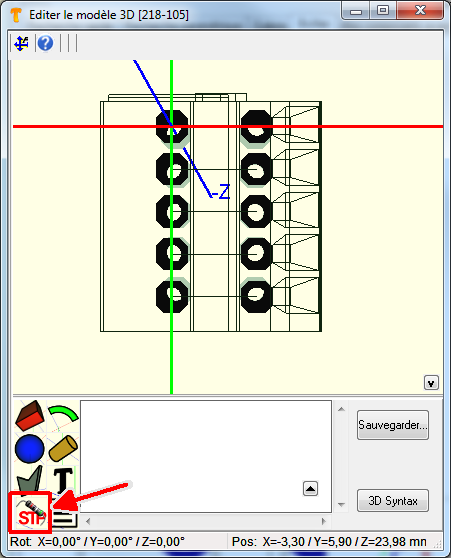
Image: In the 3D editor press the STEP button (bottom left).
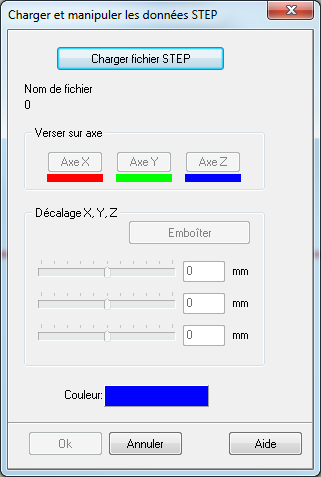
Image: The dialog "Load and manipulate STEP data" opens. Press button: Load STEP file.
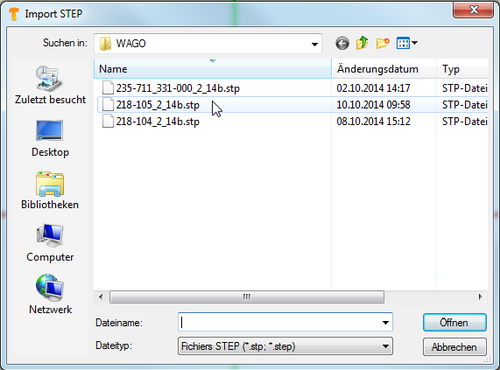
Image: Select the desired STEP file in order to open it in TARGET 3001!.
The STEP model comes in to the 3D editor and eventually needs being brought to position. So you need to align it.
In case the colour appears to you too weak in contrast you might change it in this dialog.
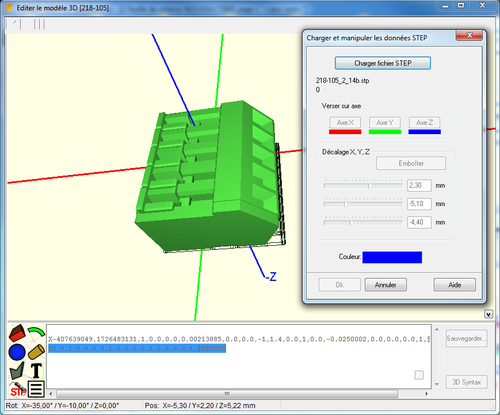
Image: In order to align the part you may flip it around X-, Y- or Z-axis and do the fine adjustment by the sliders. They represent X-, Y- and Z-axis (top to bottom)
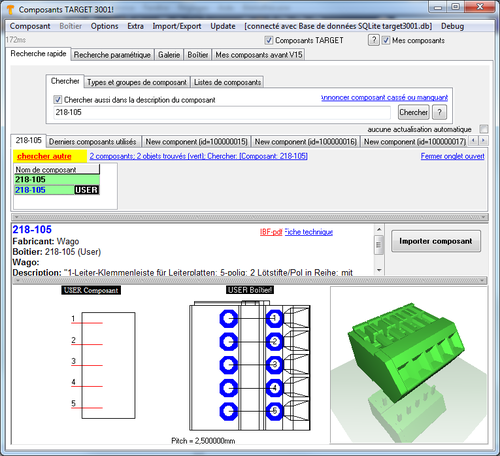
Image: The OK button overtakes the model to the TARGET part in the way you have aligned it.
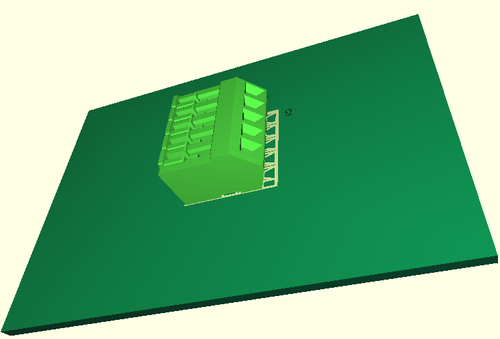
Image: The part in question used in the TARGET 3001! layout and visualized in the 3D view.
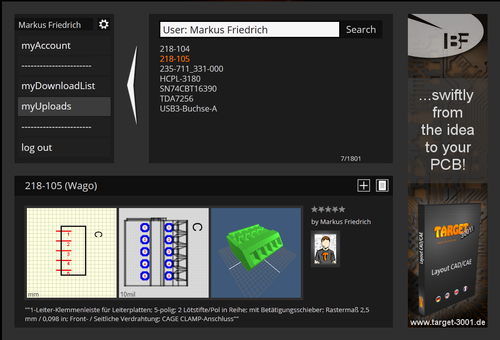
Image: In order to help other users, upload the part to the COMPONIVERSE if you like.
fr:STEP 3D Import

