Fraisage à plat avec le reste en relief : Différence entre versions
| Ligne 4 : | Ligne 4 : | ||
| − | + | Regardez aussi: [[Crash Course Face Avant]]<br><br> | |
[[Image: flachfraesen0.png|none]]<br><br> | [[Image: flachfraesen0.png|none]]<br><br> | ||
| − | ''' | + | '''Problème:''' |
| − | + | Vous voulez enlever 1mm d'un panneau frontal de 4mm d'épaisseur, avec un cylindre restant au milieu. Optiquement, un cylindre d'une hauteur de 1 mm repose sur une plaque rectangulaire. Comment peut-on usiner une telle chose ?<br><br> | |
'''Solution:''' | '''Solution:''' | ||
| − | + | Divisez le rectangle autour du cercle en deux moitiés. Laissez un demi-cercle à partir du milieu dans chacune des deux moitiés. Fraiser ces deux formes à plat pour que le cylindre central reste.<br><br> | |
| − | + | N'oubliez pas qu'un fraisage à plat ne fonctionne que dans les limites d'un contour de panneau frontal. Le bord peut être très étroit mais au moins un peu plus de 1 nanomètre à l'intérieur. C'est comme ça qu'on commence :<br><br> | |
[[Image:Flachfraesen1a_e.jpg|none]]Image: Draw half a rectangle using the unfilled rectangle tool from the drawing menu.<br><br> | [[Image:Flachfraesen1a_e.jpg|none]]Image: Draw half a rectangle using the unfilled rectangle tool from the drawing menu.<br><br> | ||
Highlight it and get black boxes at its ends. Now give it a right click [[M2]] on the left middle box. Select from the context menu: "Insert two vertices". The ligne will be divided in 4 parts having three vertices in the middle. Now you can move each of the little inner box along the line by left mousekey held [[M1H]]. Now drag the inner line segment to the right to give it a circle. Do so by using the arc icon:<br>[[Image: arc_of_a_circle.jpg|none]]Image: The Drag-Arc-Icon<br><br><br> | Highlight it and get black boxes at its ends. Now give it a right click [[M2]] on the left middle box. Select from the context menu: "Insert two vertices". The ligne will be divided in 4 parts having three vertices in the middle. Now you can move each of the little inner box along the line by left mousekey held [[M1H]]. Now drag the inner line segment to the right to give it a circle. Do so by using the arc icon:<br>[[Image: arc_of_a_circle.jpg|none]]Image: The Drag-Arc-Icon<br><br><br> | ||
Version du 29 juillet 2019 à 15:50
Cet article actuellement est en construction...
Regardez aussi: Crash Course Face Avant
Problème:
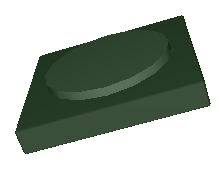
Vous voulez enlever 1mm d'un panneau frontal de 4mm d'épaisseur, avec un cylindre restant au milieu. Optiquement, un cylindre d'une hauteur de 1 mm repose sur une plaque rectangulaire. Comment peut-on usiner une telle chose ?
Solution:
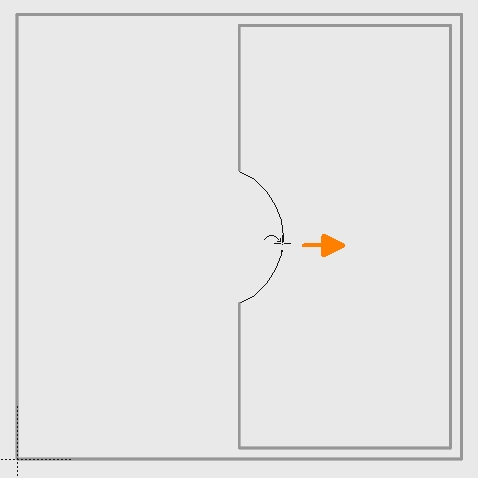
Divisez le rectangle autour du cercle en deux moitiés. Laissez un demi-cercle à partir du milieu dans chacune des deux moitiés. Fraiser ces deux formes à plat pour que le cylindre central reste.
N'oubliez pas qu'un fraisage à plat ne fonctionne que dans les limites d'un contour de panneau frontal. Le bord peut être très étroit mais au moins un peu plus de 1 nanomètre à l'intérieur. C'est comme ça qu'on commence :
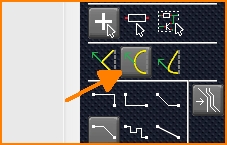
Highlight it and get black boxes at its ends. Now give it a right click M2 on the left middle box. Select from the context menu: "Insert two vertices". The ligne will be divided in 4 parts having three vertices in the middle. Now you can move each of the little inner box along the line by left mousekey held M1H. Now drag the inner line segment to the right to give it a circle. Do so by using the arc icon:
Image: The Drag-Arc-Icon

Image: Look at sidebar to the right, select the arc-tool, drag the line to an arc.
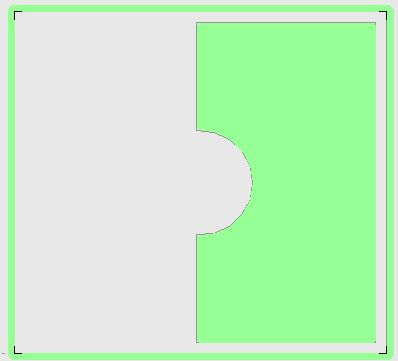
Now select the structure consisting of an arc and 5 straight lines and press the [e] key to edit. The dialog opens where you tick the following boxes:
Fichier:Flachfraesen4 e.jpg
Image: Edit the selected elements
Now you enter the new property FPBREAKOUTDEPTH and enter value 1.000.000 for this object (one million). TARGET works internally in nanometers (nm). One nanometer is one millionth of a millimeter. In other words: 1.000.000nm = 1mm. The lines now represent the boundary of a flat milling that is one millimeter deep. Copy and paste it for the second half and have it produced.


