

Electra : Différence entre versions
(→Nouveau: ELECTRA version V2!) |
(→Généralités) |
||
| Ligne 10 : | Ligne 10 : | ||
[[Image:ConnectEDA_logo.jpg|left]] | [[Image:ConnectEDA_logo.jpg|left]] | ||
| − | Si vous avez besoin d'un [[autorouteur]] notamment pour les [[projet]]s complexes, vous pouvez [https://www.ibfriedrich.com/ | + | Si vous avez besoin d'un [[autorouteur]] notamment pour les [[projet]]s complexes, vous pouvez [https://www.ibfriedrich.com/shop/index.php?main_page=index&cPath=3 acquérir] optionnellement l'autorouteur ELECTRA à [[TARGET 3001!]] Vous pouvez l'essayer facilement avec TARGET 3001!, si vous téléchargez setup.exe de l'autorouteur ELECTRA dans un répertoire à votre choix et si vous y cliquez deux fois (installation). L'[[autorouteur]] est activé en [[TARGET 3001!]], si vous appuyez ce point de menu dans le layout et si vous réglez dans le chemin du dialogue de routeur electra.exe installé. |
L'autorouteur ELECTRA est un produit supplémentaire. | L'autorouteur ELECTRA est un produit supplémentaire. | ||
| − | |||
| − | |||
== '''Nouveau: ELECTRA version V2!''' == | == '''Nouveau: ELECTRA version V2!''' == | ||
Version du 25 juin 2013 à 11:43
 |
GRATOS: ELECTRA 250 broches version dans chaque edition de TARGET 3001! |
Sommaire
Généralités
Si vous avez besoin d'un autorouteur notamment pour les projets complexes, vous pouvez acquérir optionnellement l'autorouteur ELECTRA à TARGET 3001! Vous pouvez l'essayer facilement avec TARGET 3001!, si vous téléchargez setup.exe de l'autorouteur ELECTRA dans un répertoire à votre choix et si vous y cliquez deux fois (installation). L'autorouteur est activé en TARGET 3001!, si vous appuyez ce point de menu dans le layout et si vous réglez dans le chemin du dialogue de routeur electra.exe installé.
L'autorouteur ELECTRA est un produit supplémentaire.
Nouveau: ELECTRA version V2!

Quoi de neuf?
- L'extension de règles de la hiérarchie: PCB <couche <classe <Class_layer <NET <Net_layer <Espace
- Règlement par Zone (largeur et hauteur libre par région)
- Particulièrement utile dans BGAS et CMS fins
- Interactive région éditeur de définir la zone, la largeur et l'hauteur libre
- Règlement par Zone (largeur et hauteur libre par région)
- Stratégie de routeur dans le dialogue
- Nouvelle interface graphique pour l'utilisateur
- Rapport de styles pour router les vias
- Amélioration de l'affichage pour le layout
- Contour du polygone et l'affichage des vias aveugles/bornes
- Remise à zéro et reprise - Essayez d'autres stratégies de routage avec une commande de réinitialisation, qui supprime tous routage
- Simplifié et robuste d'octroi de licenses
- Pour les licenses limités par noeuds, les codes Site et MID sont actuellement intouchés par les changements de BIOS, MB et OS
- Une mise à niveau concernant la configuration
- Installation sans souci de floating
- Amélioration du guide de l'utilisateur avec la section conseils techniques
Télécharger ELECTRA 2
| ELECTRA 2 Autorouteur (demo) | 3,28 MO | setup.exe |
Téléchargez et installez ce setup.exe dans votre répertoire de TAGET 3001!. Un répertoire supplémentaire "Electra" est généré avec electra.exe. Activez l'autorouteur "Electra" dans TARGET 3001! pour assigner le répertoire dans le menu "Actions/Autorouteur/Autorouteur Externe..."
Trouve ELECTRA dans le menu "Actions":
Régler le chemin vers electra.exe dans la section "Algorithme":
The tabs of the dialog for external auto routers
In Tab "Signals" all unrouted signals appear in a list. Which signal you'dlike to have routed please select by highlighting its signal name in the list. Using the [Ctrl] key you can highlight several signals at the same time. Clicking it again will unhighlight it. With the buttons "Select all", "Deselect all", you'll have them on one strike. If you press "Start", without having highlighted any signal, all signals get routed.

Image: The "Signals" tab in the External autorouter dialog
In section "Signal tracks" you can enter to the line "Minimum Track width:". This value is taken at minimum while routing even if you define it smaller in the schematic signal. But if you define a bigger value in the schematic signal than the one entered here, the bigger one will be taken. The same with the minimum spacing of tracks. At first the distance copper to copper counts. In the project test dialog the aura can be added. Vias also can achieve minimum width values regarding the drill hole. The width of an annular copper ring around the drill hole can be defined. An annular ring exists if a 4mm copper circle is center drilled by a 2mm drill. Around the hole a ring of 1mm width remains. The minimum entries here control the size of the vias.
The tab "Algorithm" allows strategic settings. Memory structures (as far as used in the layout) might be routed first in order not to have too many obstacles later. The same with fan outs at packages having a narrow pinout. Fan outs allow an escape to the opposite layer with a differently preferred routing direction. During disentangeling passes connections are made, during optimization passes the track lengthes are tightened.

Image: Tab "Algorithm" in the External autorouter dialog
Set the path to the electra exe You can tell TARTET 3001! where the electra exe is located. Enter the path to the line: "External Router, program-file" so that TARGET 3001! will start it.
In tab "Route layers" please select a certain routing layer and in the area to the right define how the layer shall be used for which signals. Preferred routing direction means the preferred direction of the tracks on one layer face: horizontally or vertically.

Image: Tab "Route layers" in the External autorouter dialog
Good if for every layer a certain preferred routing direction is defined. Rrouting in all directions upon one layer can be avoided that way. At the same time one can predefine certain layers for certain signals or forbid them for certain signals. A Route prohibition area is defined on a certain layer having exactly this function.
Prix pour ELECTRA 2
Versions nouvelles et prix nouvelles d'ELECTRA 2:
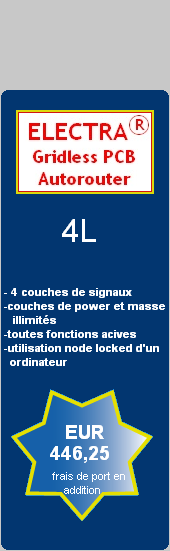 |
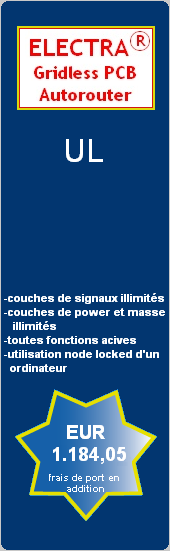
|
19% TVA (en Allemagne) inclu mais frais de emballage et port (vers la France= EUR 12,00) en addition. SHOP
ELECTRA Version 2 (mises à jour d'ELECTRA Version 1.x.x. ):
| ROUTE 4L - mise à jour de V1 | EUR 208.25 |
| ROUTE UL - mise à jour de V1 | EUR 410,55 |
19% TVA (en Allemagne) inclu mais frais de emballage et port (vers la France= EUR 12,00) en addition. SHOP
Mettre ELECTRA à jour (Update, Mise à jour)
Mettre votre ELECTRA 2 qui vous avez acheté a jour simplement echangez le fichier electra.exe. Sa location trouvez accordant le chemin comme chapitre 3 : "Télécharger ELECTRA 2".
Le dernière ELECTRA 2 téléchargez ici:
Sauvegardez le setup.exe fourni dans un répertoire de votre choix. Un double click demarre la procedure d'installation. Lors de setup vous êtes demandé où vous voudrais de sauvegarder le electra.exe. Maintenant sélectionnez le chemin comme indiqué ci-dessous que TARGET 3001! plus tard, sera en mesure de trouver le nouveau fichier exe.